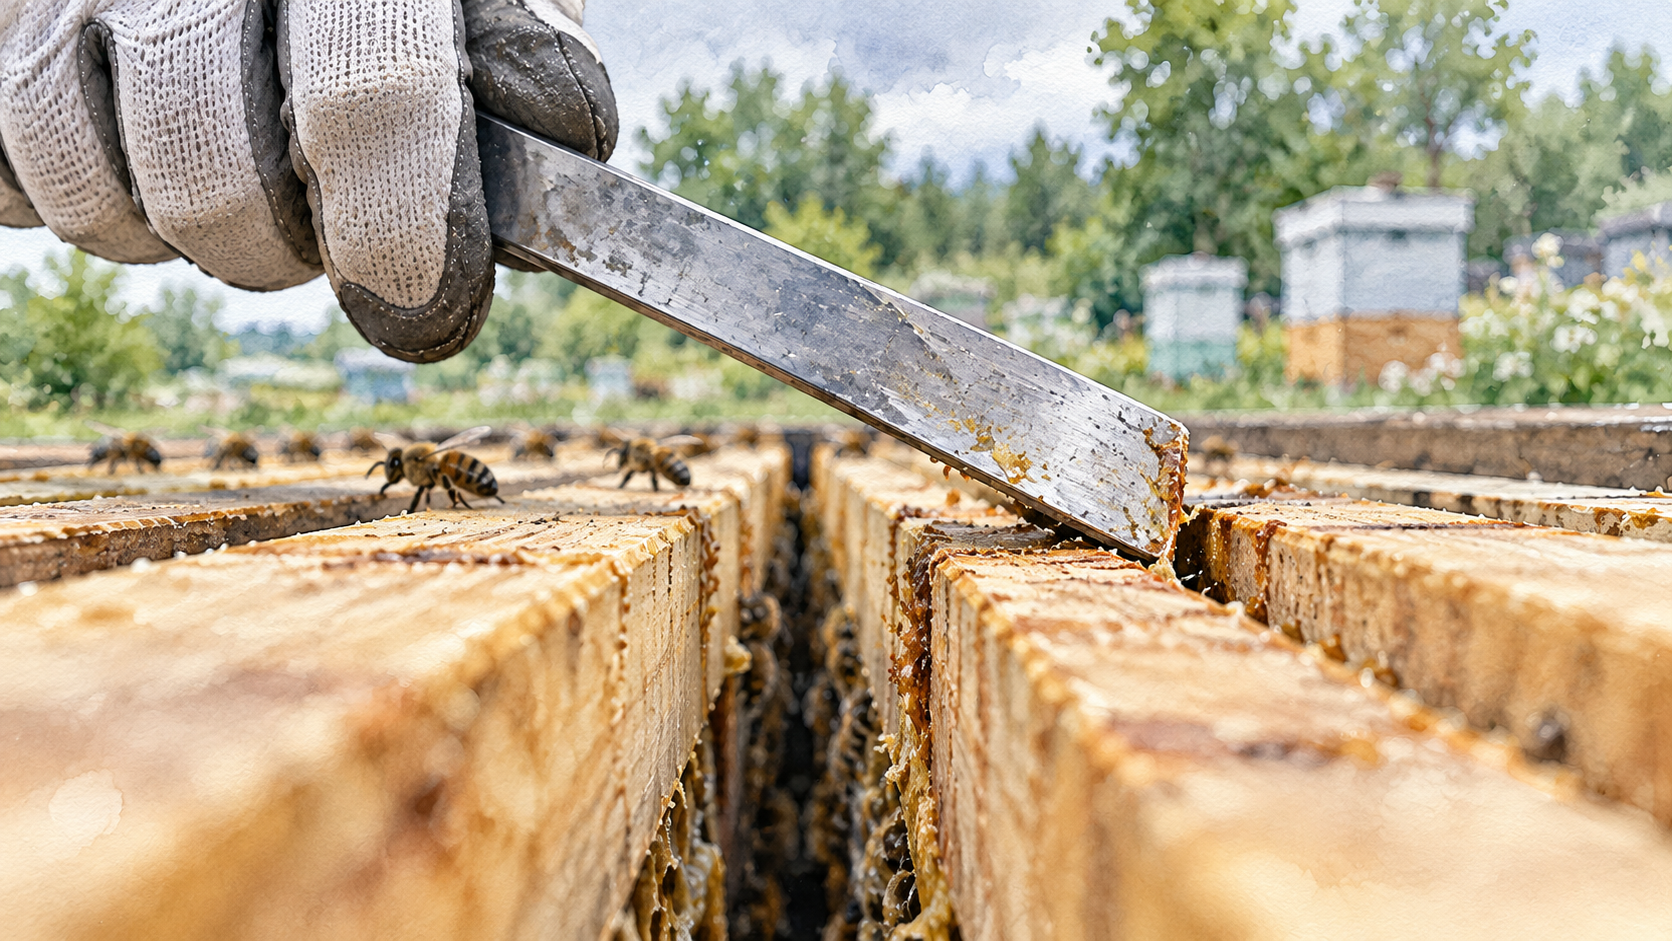
Use a hive tool by placing its flat or hooked end against a solid hive component, applying gentle, controlled leverage to break the propolis seal, and then moving the freed part without dragging it across bees or comb. In a managed honey bee hive, the tool helps separate covers and boxes, loosen tightly fitted frames, and remove obstructing wax or propolis. The aim is to release one connection at a time, not force a stuck hive apart.
For beginners working with standard removable-frame Langstroth hives, three habits matter most: find a wooden contact point before applying pressure, release both ends of a frame before lifting it, and leave enough space to put frames back without rolling bees between combs. The basic equipment guidance emphasizes slow sideways leverage rather than sudden pulling because abrupt movement can disturb the colony and damage equipment.
Understand Which Part of the Tool Does Each Job
A conventional hive tool is a flat, strong metal bar with a thin scraping blade at one end and an angled levering end at the other. The flat end slips under an accessible wooden lip, clears unwanted wax, and scrapes propolis from mating surfaces. The bend supplies leverage without requiring the beekeeper to wrench directly on a frame. A J-hook version replaces or modifies the curved end with a hook that can help raise a frame once its top-bar ends are accessible. These are alternative working shapes rather than separate pieces of equipment that every beekeeper must own.
The distinction between scraping and prying controls where the blade goes. A scraping stroke runs along a supported wooden surface to remove a small obstruction. A prying movement uses the box rim or frame top bar as a fulcrum to break a sticky joint. Neither movement should press against hanging bees, open brood cells, or unsupported comb. The hive-tool and frame-handling explanation shows these uses in the context of removable-frame hives.
A frame grip can hold a top bar after a frame has been freed, but it does not replace the need to break the propolis seal. Standard and J-hook tools differ in how they grip and lever; either can work if the point of contact is sound wood and the user can control the movement. If your hive is top-bar, Warré, or another system with unsupported or differently attached comb, do not assume the same prying and lifting technique will work. This procedure is specifically for conventional removable-frame equipment, while types of beehives for beekeeping explains the differences between systems.
Prepare the Tool and Your Hands Before Opening the Hive
Examine the metal for cracks, bends, sharp burrs, or damage that could cause it to slip. The scraping edge should be capable of passing under a seam without gouging deeply into sound wood, and the handle area should be comfortable enough to hold securely through protective gloves. Clean off hardened deposits that make the tool difficult to position. A dropped, contaminated, or damaged tool deserves attention before it is put against another colony’s equipment.
Use suitable protection, especially a secured veil, and check that your gloves allow reliable control of the tool. Bulky gloves can make it harder to feel when a frame is suddenly released; bare hands offer less sting protection. Choose a level of hand protection that is appropriate to the task and your experience rather than sacrificing either secure grip or adequate coverage. For detailed clothing fit, see what to wear when beekeeping.
Have a stable place ready for any cover or box that must be removed. A hive tool cannot safely support the weight of a honey-filled super, and using it to lift a heavy box in one motion is an avoidable source of broken wood and sudden shifting. Keep the tool where you can retrieve it without searching through a cluster of bees. If the colony cannot be worked safely because of weather, stinging, or defensive behavior, defer nonurgent manipulation and use the appropriate beekeeping sting-prevention guidance. Smoker operation has its own procedure in how to use a bee smoker safely; it is not a substitute for careful leverage.
Separate a Propolis-Sealed Cover Without Jerking It Upward
An inner cover can become adhered to the top edges of a box, while an outer cover or other hive component may stick where bees have sealed a joint. First identify the actual seam. Depending on the hive, the thin tool blade may fit between the inner cover and the upper box or under an accessible lip. Do not jab down between frames simply because the cover will not lift. A sharp push into the occupied space below could strike bees or soft comb.
Work through the release in controlled increments:
- Hold the cover steady with one hand while positioning the flat blade at a firm wooden edge with the other.
- Insert only enough blade to gain purchase. Apply small, steady lever pressure until the joint begins to open.
- Release pressure and examine whether nearby corners are still sealed. Loosen them separately rather than bending one corner high into the air.
- Once the entire cover is free, lift it smoothly while checking for bees along the contact surfaces. Place it on the prepared support.
A stuck seam can make a distinct crackling sound as propolis breaks. That is not a signal to increase force indiscriminately. Watch the wood and the gap: if a board flexes, a nail starts to withdraw, or a cover corner splits, stop and change the contact point. Removable-hive equipment guidance identifies separating hive bodies and scraping propolis as core hive-tool functions, but those functions depend on intact wooden surfaces.
Release Two Glued Hive Boxes a Little at a Time
A brood box and a honey super may adhere to one another around their mating rims. Start at a reachable seam between boxes, not near the hive entrance or through a screen. Slip the flat end under the upper box’s wooden edge and turn the tool just enough to loosen the bond. Repeat at another point if the boxes remain fixed. Do not lever so far that the upper box teeters while the rest of its perimeter is still attached.
Prying high at one corner can tilt a heavy box, break a corner joint, or open a space where bees crowd into the gap. When the box then drops back into position, those bees can be crushed. A practical method is to make a small opening, release pressure, and work progressively around accessible sides until the box separates evenly. The practical hive-inspection guidance on opening stacked boxes calls for calm, methodical movements and controlled removal of hive parts. A second hive tool may help with a stubborn seal, but it is useful only if you can maintain safe control of both contact points and the upper box.
Before lifting, confirm that no adjacent component or frame is still attached by burr comb. A box that rises with a dangling frame has not been freed correctly. Support the box with both hands once its bond is broken, lift without sliding it across exposed bees, and set it down securely. Do not use the hive tool as a handle or a substitute for appropriate lifting help when a box is too heavy to control.
Loosen Adjacent Frames Before Trying to Lift One
Frames often adhere at their top-bar ends, frame rests, or side faces. Propolis may bridge adjacent wooden ends; bees can also build wax bridges between surfaces. In a full box, the first frame is particularly awkward because there is little room to move it sideways. The purpose of the hive tool is to create a small clearance gap that lets a frame rise without scraping along the neighboring comb.
Place the angled levering end between adjacent wooden top-bar ends, where you can see that it has solid purchase. Apply modest sideways pressure to break the propolis connection, then check both ends of the frame. If the top bar is stuck to the rabbet, or frame rest, use a suitable tool tip against the wood to loosen that contact separately. Do not attempt to separate frames by pushing deeply between comb faces, where brood, the queen, and worker bees may be present.
Avoid pulling the frame straight up as soon as one end moves. If the far end remains attached, the frame can twist, tearing the top bar, crushing bees at the side, or breaking fragile comb. Slow, steady side-to-side lever movements are recommended over sudden force for exactly this kind of sticky connection. If nothing moves with gentle pressure, identify the remaining attachment before trying again.
Lift the First Frame With a Standard or J-Hook Tool
After loosening the frame’s wooden contacts, use the tool to raise one top-bar end just enough to get a secure handhold; then free and raise the other end. A standard hive tool can lever against the accessible frame rest or wooden edge. On a J-hook tool, the hooked portion is used as a lifting lever when the geometry of the top bar and surrounding equipment allows secure purchase. The J-hook demonstration and description describes a controlled crank-like lift that makes room to grasp the raised frame.
Do not assume every J-hook fits underneath every frame lug. Hook shapes, wood thickness, propolis buildup, and frame construction vary. A poorly seated hook can pry sideways against the lug, split the wood, or slip suddenly. If it will not engage cleanly, change approach rather than forcing the hook. Likewise, avoid prying directly against an exposed sheet of plastic foundation or the comb face; those surfaces are not load-bearing parts of the frame. The construction and compatibility of these components are explained in beehive frames and foundation.
Once you can grasp the frame safely, lift it level and slowly. Watch for bees on the side bars and for wax bridges joining the frame to its neighbor or the box below. Stop if another frame begins to rise with it. A full brood or honey frame can be heavy, and a loose grip or awkward angle can make it swing. Where necessary, place the freed frame temporarily in a secure frame rest or other appropriate support rather than leaving it leaning where bees could be crushed or the comb damaged.
Reposition Frames Without Rolling or Pinching Bees
Removing a single frame provides working space, but the hive tool is still useful when the frames are returned. Begin by noticing how the frames were spaced and which slots they occupied. Push the remaining frames sideways only when you can see that they are moving on their wooden supports. A sudden shove can make adjacent frame faces collide, trapping bees on protruding comb edges.
Use the bent end against a top bar or other strong wooden part to move a frame a small distance at a time. Keep your hand clear of the tool’s slip path, and watch where the frame ends meet the box rim. If a frame does not slide evenly, do not keep pushing from one corner; relieve its stuck end first. When lowering a removed frame, guide it vertically through an available gap so its comb does not scrape against bees on the next frame. Move slowly enough for bees on the rim or projecting wax to clear the surfaces where wood will meet wood.
The hive-inspection instructions for restoring frame order advise returning combs in their original sequence and orientation unless a deliberate management change is being made. That prevents an unplanned rearrangement while you concentrate on the tool.
Frame spacing matters after the tool work is done. Langstroth equipment depends on clearances that let bees travel and limit unwanted wax or propolis buildup. Replace frames so the top bars sit properly on the frame rests, keep them together in the intended alignment, and distribute any designed extra clearance rather than leaving one conspicuously wide gap between neighboring frames. This is part of avoiding future sticking, not a reason to compress an occupied space suddenly. If frames cannot return without forcing them, check for damage, bent parts, or incompatible components instead of packing the box tighter. The full sequence of evaluating brood, stores, and the colony belongs to how to inspect a beehive.
Scrape Propolis and Burr Comb Only Where They Interfere
The flat edge of a hive tool can remove propolis from a frame rest, the rim where two boxes meet, or a wooden top-bar surface that needs to sit flat. Angle the blade along the wood and work in short strokes that you can stop immediately. Place the removed material in a suitable closed container instead of dropping sticky scrapings onto the hive entrance or ground. Biosecurity guidance for hive inspections warns that discarded material may encourage robbing and potentially move pests or pathogens. Keep scrapings off gloves and equipment you will carry to other colonies.
Burr comb is wax built in spaces where it obstructs equipment movement. Thin exposed bridges between box rims or top bars may need careful removal so frames and covers can seat correctly. Before cutting, however, look for bees, brood, and possible queen cells attached to the wax. A wax projection can contain developing brood or a queen cell; blindly scraping it away may damage the colony. Where the purpose and contents are unclear, stop and seek an experienced beekeeper’s assessment rather than treating every irregular comb as debris. A practical discussion of hive-tool scraping identifies excess comb removal as one use, not a direction to scrape out every wax feature.
Propolis itself is a normal part of a honey bee colony. The aim is not to strip every surface until it looks new. Remove the amount needed to restore proper movement or seating, especially on frame rests and box contact edges. Excessive scraping takes time, exposes fresh wood, and increases disruption without necessarily improving the hive. If a queen excluder or other removable accessory is stuck to a box or top bars, free its attached edge carefully before lifting it, and check for bees underneath. A sharp tool can tear plastic fittings or bend thin metal when inserted at the wrong angle. This distinction also reduces the temptation to dig a blade around the brood area merely to make the equipment appear tidy.
Identify Why the Tool Is Meeting Resistance
A hive tool should help you feel a joint release. It should not become a way to overcome every obstruction by applying more strength. Use the point of resistance to decide what to inspect next:
| What you notice | Likely physical problem | Safer next action |
|---|---|---|
| Cover or box lifts at one corner only | Another part of the perimeter remains sealed | Settle and support the component, then loosen the remaining accessible seams |
| One end of a frame rises, but the other stays down | The far top-bar end or frame rest is still glued | Lower the raised end, find the second attachment, and release it separately |
| A neighboring frame moves with the one being lifted | Propolis or wax bridges connect them | Lower both, separate the bridge carefully, and inspect the comb before lifting again |
| Metal slips, wood fibers lift, or a lug starts splitting | Poor tool purchase or damaged frame wood | Stop levering at that point; plan a controlled removal or equipment repair |
| Bees are crowding into a narrowing gap | The closing surfaces are occupied | Stop closing, reopen slightly if safe, and allow the bees to move before proceeding |
These are troubleshooting observations, not diagnoses of the colony. More pressure is rarely the right answer when the source of resistance is unknown. A tool that slips can injure the beekeeper, the bees, or the queen; a cracked frame can spill bees and comb. If a frame is structurally unsound, leave it supported while obtaining help or planning a safe replacement rather than trying to swing it free. Complex repairs and building modifications belong with how to build a beehive.
Clean the Hive Tool Without Spreading Contamination
Hive tools can carry propolis, wax, honey, and debris from one colony to another. That matters even when two colonies appear normal, because some pests and pathogens may be present before signs are obvious. Routine cleaning removes visible material; disinfection addresses biological contamination and calls for a method appropriate to the equipment and suspected hazard. Treating the two as interchangeable can create a false sense of security.
After working a colony, scrape away stuck material using a safe method that keeps your hands away from the metal edge. Clean and dry the tool before storage. When moving between apiaries, change to a clean, disinfected tool or follow an appropriate established disinfection protocol. If a colony is suspected of having a contagious brood disease, stop sharing the tool and other exposed equipment while you obtain advice from a state apiarist or a qualified bee-health professional. The honey bee biosecurity guidance for personal equipment specifically identifies hive tools as possible carriers of pests or pathogens and recommends changing or disinfecting tools between apiaries and affected hives.
Do not assume that wiping away wax or briefly warming the blade will make contaminated equipment safe. Some organisms, including the spores associated with American foulbrood, are notably persistent. For example, state apiary information on American foulbrood explains how a persistent brood pathogen triggers specific disease-control requirements. Those requirements, and advice from the authority responsible for your own state, take priority over ordinary scraping. Extension advice on previously used hive equipment describes the severity of that risk. Avoid casual use of open flames near hive equipment, clothing, or dry farm materials; if specialized heat disinfection is required, follow an appropriate verified procedure outside the hive and in compliance with fire restrictions. Cleaning routines do not replace reporting or other disease-control requirements that may apply in your state.
Finish With a Frame and Box Seating Check
The tool’s work is finished when every frame has returned to a stable wooden support, the intended gaps are restored, and covers and boxes can be lowered without trapping bees. Check the top-bar ends, the frame rests, and the corners where the box above will sit. Remove an isolated lump of propolis or obstructing wax if it prevents a component from seating flush. There is no need to continue scraping once the parts fit and the bees are clear of contact surfaces.
Lower the upper component slowly while watching the entire accessible perimeter. A box should settle into place without being driven down by the hive tool. If one corner is held up, lift it safely and identify the obstruction rather than pulling the box closed against occupied space. Account for the tool before leaving, clean it as appropriate, and note any splitting frames or damaged rims that need attention at the next suitable opportunity.
For a new beekeeper, the clearest sign of correct technique is a controlled release rather than a loud or abrupt one. A cover loosens without levering a corner apart, a frame rises after both ends have been freed, and the same frame returns without squeezing neighboring combs together. If achieving that requires force beyond what you can apply steadily and safely, stop and seek a hands-on demonstration from an experienced local beekeeper.
3 thoughts on “How to Use a Hive Tool”