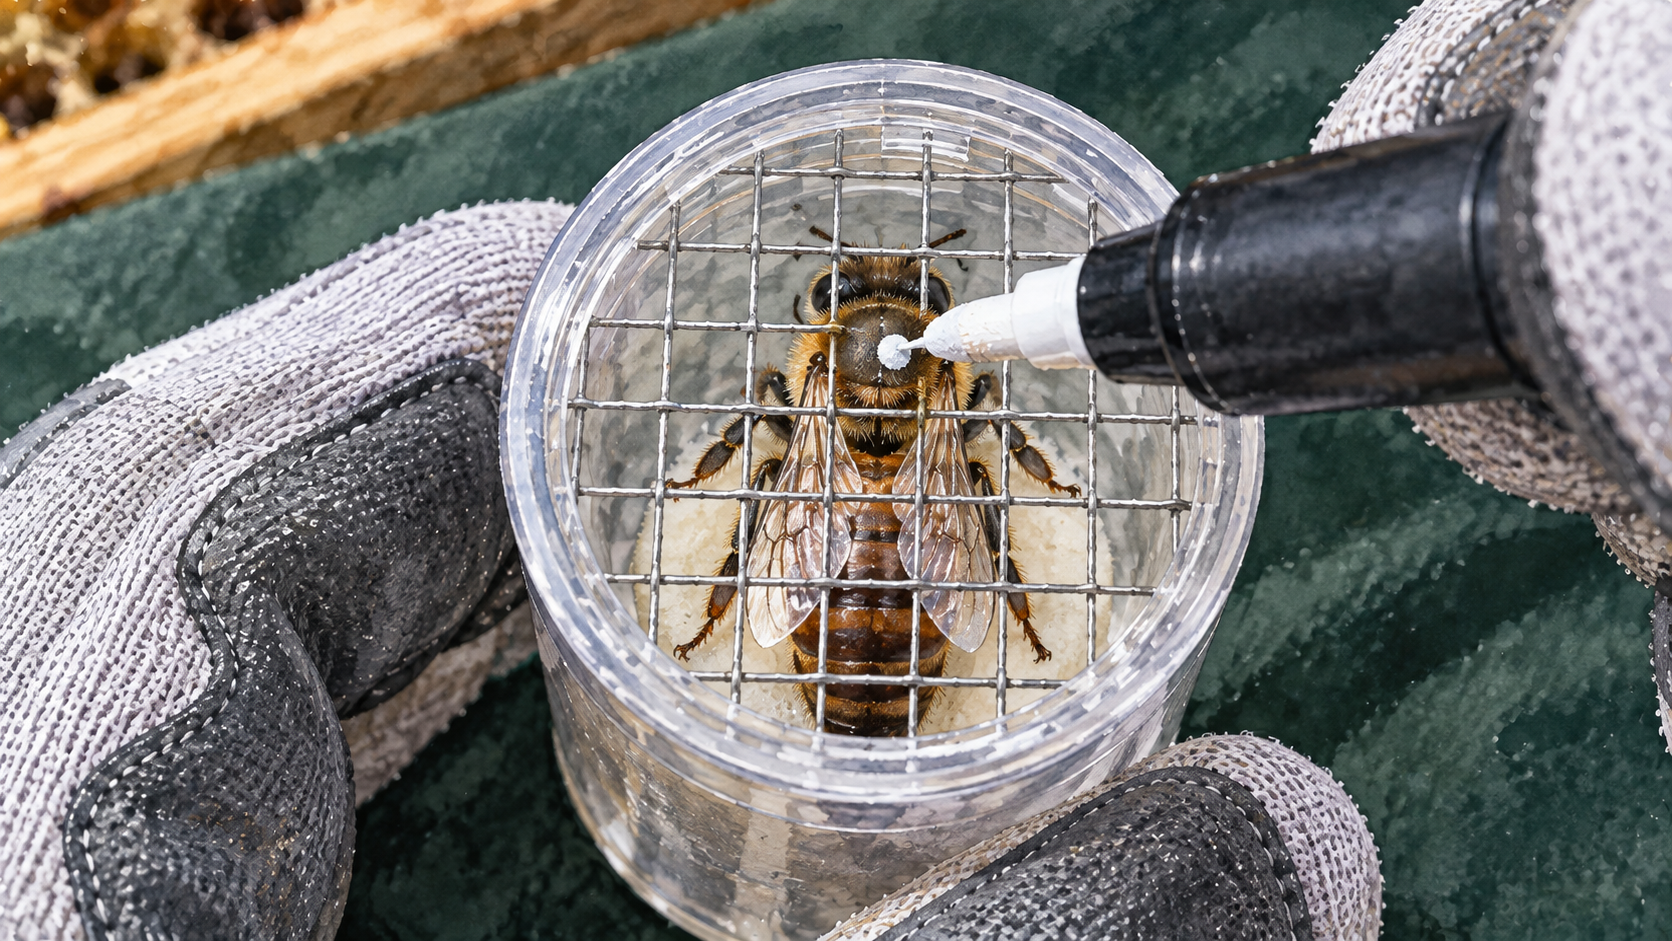
To mark a queen honey bee, restrain her gently in a suitable marking cage, place one small dot of bee-appropriate paint on the top of her thorax, let the mark dry, and return her carefully to her own colony. The mark makes her easier to locate and can help track which queen is present, but marking is optional. A beekeeper who cannot restrain her confidently should ask an experienced mentor to demonstrate the technique rather than risk injuring the colony’s queen.
The procedure below applies to managed western honey bees (Apis mellifera) and focuses on marking an established queen, not replacing her or introducing a new one. A small mistake can damage her wings, legs, or body, so the safest marking attempt is the one you can abandon before she is hurt.
Why Mark a Queen, and When Is It Better to Leave Her Unmarked?
A painted dot helps a beekeeper find the queen while examining crowded brood frames. It also creates a simple record of which queen was present at an earlier inspection. If a previously marked queen is gone and an unmarked queen appears later, replacement through supersedure, swarming, or another event is a possibility worth investigating. The absence of a mark is not proof by itself: paint can wear off, and records can be wrong.
Marking may be useful in a small breeding operation, a teaching apiary, or any yard where several similar colonies make queen records hard to maintain. A consistent color convention provides an approximate age reference when the queen’s origin year is known. These are management conveniences, not evidence that a marked queen lays more eggs or performs better. The queen-management guidance on marking and recordkeeping treats identification as the practical benefit.
There are also good reasons to wait. Do not disturb a newly introduced queen merely to add a dot before you know she has been accepted. Postpone marking when the colony is very defensive, the weather makes an inspection unsuitable, or the queen is difficult to restrain without forcing a cage into crowded comb. Avoid handling a virgin queen that still needs mating flights unless a competent queen breeder has a specific reason and suitable methods.
If you can evaluate the queen’s work through eggs and brood during an ordinary hive inspection, marking is not urgent. The decision is whether the identification benefit outweighs the extra handling risk on that particular day.
Queen-Marking Tools and a Safe Working Setup
For a first attempt, prepare a queen-marking pen intended for bee marking, a clean queen catcher or marking cage, appropriate protective clothing, and a secure place to set down your tools. Common options include a mesh-topped tube with a soft plunger, a hinged queen clip, and a push-in marking cage used on comb. The marking tool must hold the queen lightly enough to avoid injury while leaving the top of her thorax accessible.
Use a pen or paint specifically recommended for bee marking, or another non-toxic marking product supported by established beekeeping guidance. An improvised marker may release too much liquid or contain unsuitable solvents. Never assume that nail polish, correction fluid, or an unidentified permanent marker is safe simply because it leaves a visible dot. The published marking procedure and paint guidance emphasizes non-toxic markers and checking the pen’s flow before touching the queen.
Test the pen on scrap paper or another clean surface. The tip should leave a small controlled spot, not drip or flood. Keep the cap and pen where they can be reached without shifting a frame full of bees. Have a sheltered working area so that a queen is not exposed to strong wind while the cage is open; never leave her in direct sun or an unventilated container.
Wear protection appropriate to the colony while maintaining enough hand control to operate the cage precisely. Bulky gloves can make delicate handling awkward. The guide to protective beekeeping clothing explains that tradeoff. If you cannot operate the equipment steadily while protected, use a compatible tool or obtain help instead of removing protection in an unsafe colony.
Queen-Marking Color Codes and What They Actually Tell You
White is the conventional queen-marking color for 2026. The international five-color rotation links a queen’s mark to a year. The pattern repeats every five years, so a colored dot is a useful shorthand but not a complete age record. The color reference below matches the published international marking convention.
| Year ending in | Queen-marking color | Example years |
|---|---|---|
| 1 or 6 | White | 2021, 2026, 2031 |
| 2 or 7 | Yellow | 2022, 2027, 2032 |
| 3 or 8 | Red | 2023, 2028, 2033 |
| 4 or 9 | Green | 2024, 2029, 2034 |
| 5 or 0 | Blue | 2025, 2030, 2035 |
The underlying information must be honest. Sources sometimes describe this as the year a queen was reared and sometimes as the year she was introduced or marked. Those events usually occur close together but are not interchangeable for a purchased older queen. If the breeder provides a reliable rearing year, use that year consistently and record it. If her age is unknown, do not pretend that choosing the current year’s color establishes her birth year. Record “age unknown; marked 2026” or use a separate identification notation in your records.
A queen marked blue in 2025 does not need a white dot added in 2026. Keep the original mark unless it has failed and remarking is genuinely needed. Color is an aid to identification, never a substitute for dated hive notes about her purchase, introduction, and observed performance.
Choosing a Marking Cage That Does Not Injure the Queen
For most beginners, a purpose-made catcher combined with a soft-plunger marking tube offers more control than directly holding the queen between fingertips. After transferring her into the tube, a soft surface brings her close enough to the mesh for a precise dot. The plunger must not squeeze her abdomen or pin her wings. Watch her position at every adjustment and stop if she becomes trapped sideways. Check the catcher for damage or contamination before using it in a different colony; routine cleaning and disease-related disinfection are not the same task.
A queen clip is useful for gently collecting a queen from the frame. Its openings let workers move through while restricting the larger queen, but that does not mean the jaws can be snapped shut against her body. Close it slowly, checking where her legs and wings are. Some catchers are designed for capture only; the queen must then move into a separate marking tube. Follow the specific device’s directions rather than treating every cage as interchangeable.
A push-in marking cage may allow the queen to be marked where she stands on comb. It requires a clear, reasonably even patch of comb and an unobstructed view. Sharp pins, abrupt pressure, or nearby bees can make this method unsafe. Do not force a cage into a crowded brood area or press it down onto a queen who is trying to move away. Detailed marking demonstrations and beginner precautions recommend using a catcher when manual restraint is unfamiliar.
Experienced handlers sometimes hold a queen directly by her wings or body. That may work in trained hands, but the consequences of slipping are serious. The choice of cage should be based on whether you can control the queen without pressure, not which method appears fastest in a video. Practicing the cage motion with a drone under experienced supervision can expose awkward movements before the queen is involved.
Finding the Right Moment to Capture Her
Choose a mild, suitable inspection period when bees are working normally and you can open the colony without rushing. Prepare the marker and catcher before lifting a frame. Avoid taking a queen out of her colony simply because your equipment is already laid out; first confirm that the bee you have found is the queen and that you have a workable position for capture.
Look on brood frames, where the queen may be walking among attendants or laying eggs, but do not assume she is always there. Use the queen-identification guide if recognition is uncertain. If multiple similar-looking bees are present, pause rather than collecting the wrong one. A marked queen is easier to notice later, but finding her the first time still takes observation.
Keep the frame over the open hive or a stable work position that minimizes the risk of dropping her. Do not hold a frame high over bare ground while trying to manage a marking tube with the other hand. Limit jostling and avoid brushing a dense cluster of workers toward the queen. Where necessary, a second experienced person can steady the frame while the handler operates the cage.
A queen that keeps disappearing beneath other bees or into crowded comb is a practical reason to stop. The queen-handling demonstrations show that capture and marking are controlled tasks, not an exercise in chasing the queen across frames. Reassemble the hive safely and try on a better day, especially if bees become increasingly defensive.
How to Mark a Queen Bee Step by Step
The following sequence assumes a mated queen in her established colony and a suitable catcher plus soft-plunger tube. If you use a different marking device, follow its instructions for capture and restraint. Do not improvise the transfer while holding a loose queen.
- Prepare the pen and cage first. Confirm the pen produces one small dot on a test surface. Check that the tube, mesh, plunger, and catcher close and move correctly. Choose the color from a reliable queen record, not from the current calendar alone.
- Locate and positively identify the queen. Work over the hive and keep her in sight. If you are unsure which bee she is, stop rather than marking a worker or drone.
- Enclose her without pinching. Guide her gently into the catcher following its design. Before moving anything, check that her wings, legs, and abdomen are clear of the closure.
- Transfer her only if the equipment requires it. Bring the catcher and tube together as directed by the manufacturer and let her move into the tube. Avoid shaking or knocking her against the sides.
- Position the soft plunger gradually. Bring her upper thorax near the mesh with the smallest pressure needed to steady her. If a wing folds awkwardly or her body twists, lower the plunger and reposition rather than pressing harder.
- Apply a small dot to the top center of the thorax. Touch lightly through the mesh once. Keep paint away from the head, eyes, wing bases, legs, and abdomen. Do not make repeated strokes to create a larger mark.
- Allow the paint to dry. Follow the product’s directions and observe the dot rather than relying on an arbitrary number of seconds. Maintain ventilation and protect her from temperature extremes during the short wait.
- Release her gently onto a frame in her own colony. Let her walk out rather than tapping or shaking her onto the comb. Watch briefly for normal movement and the workers’ response, then close the hive without prolonging the disturbance.
The technical queen-management instructions support a small thorax mark, a pretested pen, drying before release, and observation of how workers receive the queen. Never attempt to improve a crooked or faint dot while she is struggling in the cage. One modest, readable mark is sufficient.
After Marking: Release, Worker Response, and When to Stop
A dry dot is only part of a successful marking attempt. First confirm that the queen can walk normally when the restraint is removed. She should not have paint connecting her wings to her thorax or visible difficulty moving her legs. If paint has reached sensitive areas, avoid scraping or applying chemicals to remove it. Ask an experienced beekeeper or qualified bee specialist for help rather than trying an improvised cleaning procedure.
Return the queen to the same colony from which she was taken. A freshly marked queen can attract worker attention, but brief contact with attendants is not enough to conclude that the colony has rejected her. The practical guide to post-marking observations distinguishes ordinary worker contact from a tight, persistent group of attacking bees. Observe without repeatedly poking or brushing bees off her. If workers tightly surround and restrain her, appear to be attacking her, or she seems injured, stop routine marking activity and get experienced assistance. Guidance on worker response after marking describes temporary protective caging as a possible response to aggressive reception; this is not a reason for beginners to improvise prolonged confinement without support.
Do not expose the colony to excessive smoke in an attempt to disguise paint odor, spray the queen with syrup, or force workers to separate with a tool. Those additions are not needed for an ordinary marking procedure and can create other problems. Keep the hive disruption brief and make a dated note of what occurred, especially if the queen was difficult to release or her behavior appeared abnormal.
If the queen flies free during transfer, do not grab at her or chase her across the apiary. Pause, watch where she goes from a safe position, and seek an experienced beekeeper’s help if she cannot be recovered. A queen outside the hive is an urgent handling problem, but rough pursuit may injure her or make recovery harder.
If the queen disappears immediately into the colony after a normal release, that alone is not a failure. Schedule the next check according to normal colony circumstances rather than reopening the hive repeatedly just to admire the mark. A useful record includes the color, known queen-origin year, date marked, and any unusual observation.
Can Marking Harm a Queen, and Which Mistakes Matter Most?
Yes. Queen marking is generally a minor management task, but physical restraint and misplaced paint can injure or kill a queen. The principal avoidable hazards are pinching her body, trapping a wing or leg, pushing a plunger too firmly, dropping her outside the hive, and applying excess paint to parts other than the thorax. Working in poor weather or with a highly defensive colony increases the chance of hurried movements.
Paint quantity matters. A single controlled dot on the thorax is the purpose; a broad coating does not make her safer to find. Do not use unknown adhesives, household solvents, insecticides, or improvised cleaning mixtures. If you choose numbered identification discs instead of paint, they require a different attachment technique and should not be applied with improvised glue. The description of accepted marking materials documents paints and discs as distinct approaches, not interchangeable steps. Additional experienced beekeeper guidance on queen-marking errors emphasizes allowing the dot to dry thoroughly and leaving the wings and other body parts free of paint.
Marking is also separate from wing clipping. A paint spot helps visual identification; clipping changes a queen’s ability to fly and involves additional welfare and management consequences. It is not part of this procedure, nor does painting prevent swarming. Beginners should not clip a queen’s wing as an optional add-on while she is restrained for marking.
There is a sensible stopping rule: if you cannot keep the queen secure without pressure, if the pen is leaking, or if bees are overwhelming the catcher, release or return her safely with appropriate help and abandon the attempt. The guidance for novice queen handlers favors purpose-made catchers for precisely this reason. Unmarked is better than injured.
How to Find a Marked Queen Later and Keep Accurate Records
During later inspections, search for the mark as the queen moves across brood comb, but keep observing body shape and behavior. A painted dot can be obscured by workers, fade with wear, or disappear. Not seeing it on one inspection does not prove the queen has been replaced. A mark can also resemble debris or an unusual color patch when the light is poor, so use the queen’s whole appearance for confirmation.
A small hive record prevents color errors from becoming mistaken conclusions. Note the colony identifier, origin of the queen, rearing year if documented, installation date if different, marking date, color, and whether the mark was observed on subsequent visits. When a purchased queen arrives already marked, ask the supplier what the color indicates. A white dot could be consistent with 2021, 2026, or another year in the repeating cycle; it cannot establish her age by itself.
When a marked queen appears to have been replaced by an unmarked queen, look at the colony’s wider evidence. Brood and egg observations, recent swarming, queen cells, and supplier or inspection records may help explain the change. The guidance on confirming queenlessness and the separate requeening article address those decisions; a missing dot is not sufficient evidence to take either action.
A queen can remain unmarked indefinitely if continued marking attempts would add unnecessary risk. If the mark is unreadable, decide whether re-marking offers meaningful value before repeating the handling. Good records and observation are more reliable than a colored dot alone.
Practical Questions About Queen Marking
Can you mark a queen that is already laying eggs? Yes. An established mated, laying queen can be marked during suitable hive conditions when she can be restrained safely. The presence of eggs does not require you to mark her, however. Postpone the task if she is newly introduced, the colony is disturbed, or the handler has not practiced with the equipment.
Can you mark a queen while she is inside a shipping cage? Some suppliers provide marked queens, but ordinary shipping cages are not necessarily designed for precise marking or drying. Do not poke a pen through a shipping-cage opening or open the cage prematurely. Use a dedicated marking device and obtain appropriate guidance, particularly if her introduction or acceptance is still pending.
Does queen marking prevent swarming or prove that a queen is healthy? No. A paint spot changes how easily a beekeeper recognizes her; it does not remove the colony conditions that trigger swarming, and it is not a health examination. Monitor queen performance using normal colony observations. The guidance on swarm management deals with the actual risk factors.
Should you remark every queen each spring? No. Leave a clear existing mark in place. Remark only when identification has become genuinely difficult and the benefit justifies handling, using an accurate record of the queen’s year when known. Annual repainting in the current year’s color would make the age information misleading.
One thought on “How to Mark a Queen Honey Bee”