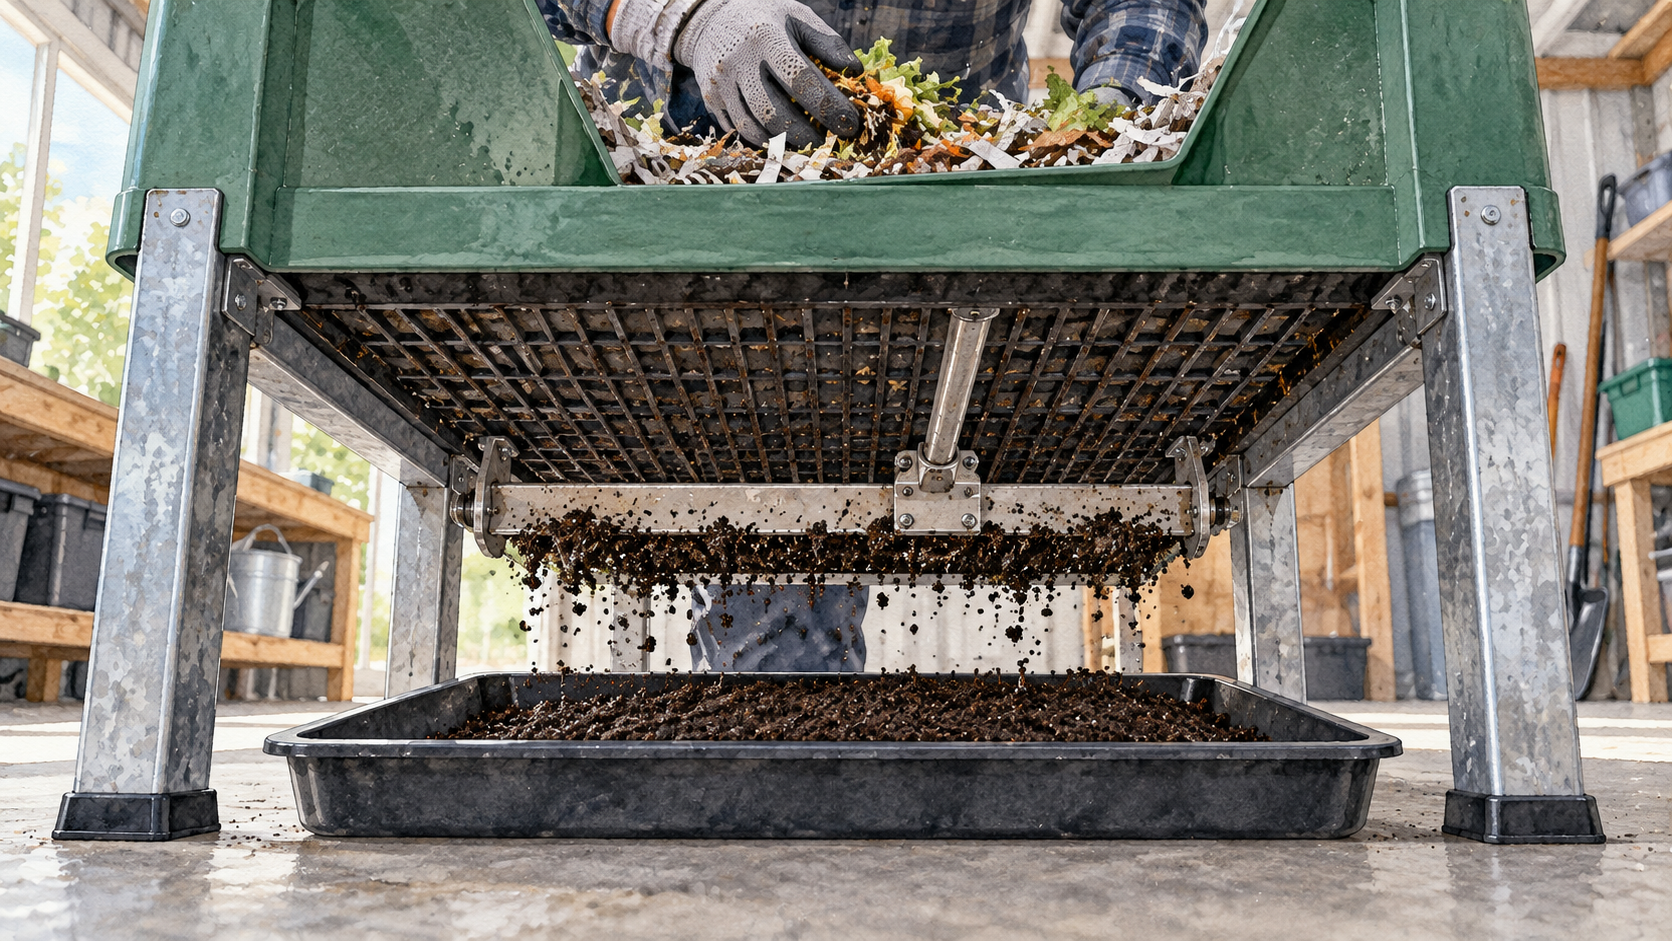
A continuous-flow-through worm farm uses a raised container with an accessible top for feeding and a controlled opening or grate underneath for harvesting mature vermicompost. Composting worms work mainly in the newer, upper material. As the contents settle and break down, older material accumulates toward the bottom, where it can be removed without emptying the entire bed.
To set one up, select a suitable sheltered site, install a structurally sound raised chamber and bottom-harvest mechanism, cover the grate temporarily with biodegradable material, add conditioned moist bedding, introduce identified composting worms, and begin feeding cautiously from above. Do not start bottom harvesting until the lower material is sufficiently processed and the bed is established. The key advantage is reduced disruption during repeated harvests, not immediate or automatic compost production.
Continuous-flow beds are managed differently from ordinary DIY bins or other vermicomposting methods, but they still need suitable worm stock and reliable bedding temperatures.
Understand the top-to-bottom layout before selecting equipment
A true continuous-flow-through (CFT) system has three functional zones. Fresh feed and active worms occupy the upper portion. Partially decomposed bedding and feed move through the middle as the bed develops. Older, more processed vermicompost is removed from beneath a supporting grate or other designed bottom outlet. In the North Carolina State Extension description of continuous-flow reactors, this is a raised bed with solid sidewalls and a grating; a bar removes a thin layer of finished material above the grate so it falls into a collection area below.
The term continuous describes repeated addition and collection over time. Material does not flow freely like water, and a new unit does not immediately yield finished castings. Worms, moisture and bedding must form a stable working layer before any meaningful bottom harvest is possible. A removable stacked-tray bin is not the same mechanical arrangement, even if fresh scraps are continually added to its upper tray.
Choose between a purpose-built small flow-through container with a designed lower discharge and a larger, framed reactor with a grate and scraper. The operating principle is shared, but support structure, weight, clearances and harvesting hardware are model-specific. The following is a setup framework, not an engineered structural drawing.
Choose the site and working footprint first
The unit needs more than enough room to fit its outer frame. Leave access to the feeding surface, room to withdraw harvested material below, and a clear route for carrying bedding and incoming feed. For a larger unit, also allow clearance for the full movement of a manual harvesting bar, service panels or collection cart. Santa Clara County Cooperative Extension’s working CFT example describes regularly feeding from the top and drawing a bar across the bottom to collect material.
Select a level, stable, well-drained site protected from direct summer sun, freezing exposure and rain entering the chamber. Indoor or roofed locations are generally easier to manage. Avoid stormwater paths, floor drains that could receive untreated runoff, and places where escaping worms could enter nearby natural habitats. The EPA’s overview of vermicomposting calls for protection from light, rain and temperature extremes, as well as air exchange and a way for excess liquid to drain.
Surface area is the first useful measurement. A bed with an actual usable interior measuring 3 by 4 feet has 12 square feet of working surface. That arithmetic helps compare equipment footprints; it does not establish a safe waste-processing rate or tell you how many worms to buy. Dimensions, maximum fill height, feed loading and total weight require the specific unit’s documentation and intended conditions.
A full, wet flow-through chamber can be heavy. Do not assume that a household shelf, improvised wooden stand, plastic table or elevated pallet assembly can safely carry it. Large custom frames, supports and any mechanically powered harvesting system require appropriate structural or mechanical design, load assessment and, where applicable, code review. A commercially manufactured unit still needs installation according to its instructions.
Identify the essential components and what can go wrong
You do not need a powered conveyor, automatic watering system or motorized scraper to understand or operate a modest CFT farm. You do need a reliable way to support the contents while removing small quantities from below.
| Component | Job | What to check before stocking |
|---|---|---|
| Raised frame or supported vessel | Holds the loaded bed off the floor | Documented load suitability, secure footing and no rocking |
| Solid sidewalls or suitable bag | Holds the bedding together and limits light | Sound seams, washable surfaces and no escape gaps |
| Load-bearing bottom grate or outlet | Supports material while allowing controlled discharge | Secured to the frame; opening pattern suited to the product and harvest device |
| Liner or temporary base sheet | Prevents fresh bedding falling through the grate during startup | Biodegradable where specified; covers the openings without permanently blocking drainage |
| Harvesting bar, scraper or bottom hatch | Releases the oldest processed layer | Can be operated without reaching into moving mechanisms or risking a full-bed collapse |
| Collection bin or platform | Receives discharged vermicompost | Can be removed without lifting or tipping the entire farm |
| Rain/light cover and airflow paths | Protect worms and let the bed breathe | Keeps out weather and pests without sealing the chamber airtight |
For context, the NC State reactor guide describes grate openings commonly measuring 2 by 2 inches or 2 by 4 inches in its raised-bed systems. Those are documented examples, not specifications for all homemade or commercial units. A small bag-type flow-through product may use a much smaller closable bottom opening and follow entirely different manufacturer instructions. Do not enlarge a grate or remove support rods to match an example without checking the intended design.
For powered scrapers, protect hands from moving bars, pinch points and drive mechanisms. U.S. workplace machinery can be subject to OSHA’s machine-guarding standard, 29 CFR 1910.212. Do not improvise motor, chain, hydraulic or winch modifications or bypass fitted guards. Have a qualified professional design or approve substantial mechanical changes.
Assemble and commission the empty system
Set up the support frame or purchased CFT unit on its final surface before adding any bedding. Fit the grate, bottom closure and collection arrangement according to their intended design. Make sure the upper edge is reachable without climbing on the equipment or leaning dangerously over the chamber. Prevent access by children, pets and rodents, especially near the lower harvesting opening.
For a manufactured unit, assemble the load-rated stand first, secure the chamber and bottom support exactly as supplied, install the maker’s harvesting control, and then position the collection vessel. For a custom large installation, have a qualified person determine the frame, attachment and scraper arrangement before construction; a grate specification from another design is not a substitute. Once the unloaded assembly is stable, carry out the following commissioning checks.
- Structure: verify level footing, secure fasteners, sound seams and the manufacturer’s or designer’s loading limits. Stop if any component flexes unexpectedly or support capacity is unknown.
- Harvest control: open and close the discharge or move the manual scraper through its designed travel with the unit unloaded. Confirm it cannot unexpectedly dump the entire contents. Keep hands out of trapping points.
- Collection access: place the collection container beneath the outlet and remove it again without crawling under an unstable frame or putting your body beneath a moving mechanism.
- Air and water path: confirm that airflow and drainage routes are not obstructed, and that any leachate can be collected without reaching nearby soil, drains or animal areas.
- Weather and pests: check that covers can close securely, ventilation is retained, and rain cannot run straight into the bedding.
These are practical editorial commissioning checks synthesized from reactor design and worm-care guidance. They do not substitute for load certification, professional mechanical inspection or the equipment maker’s instructions. Recheck stability once the first conditioned bedding has added weight, before introducing worms.
Prepare the grate and establish the first bedding layer
Fresh loose bedding would fall through a bare grate. For a typical rigid CFT reactor, NC State describes laying layers of newspaper or brown paper over the mesh, then placing approximately 6 inches of moist, conditioned bedding above it. By comparison, UMass Extension’s dairy-farm reactor guide describes approximately 12 inches. These are different documented startup examples. Do not average them into a universal specification or use either depth against a particular manufacturer’s instructions.
Choose bedding that is loose, absorbent, sufficiently broken down and free of hazardous residues. Condition it before the worms arrive. Fresh manure and readily decomposable, nitrogen-rich ingredients can heat or release ammonia as microorganisms work; that is dangerous in a living worm bed. The UMass guide recommends pre-composting manure before using it, but a calendar alone does not prove the material is cool, stable or otherwise safe. Check its actual condition before loading. Detailed bedding recipes and species-specific moisture management belong in their own guides.
After the initial layer is placed, look from below to confirm that the paper is holding the contents without forming a permanent plug. Check that the grate and frame remain stable under the added weight. If bedding pours through, do not simply pile in more material: stop and correct the startup liner or hardware arrangement. If liquid is pooling, correct drainage rather than assuming the worms will tolerate it.
Add composting worms and begin top feeding gently
Use composting worms that are positively identified and suitable for the system, commonly red wigglers (Eisenia fetida). Obtain them from a responsible supplier and check the shipment for unwanted species. Do not collect unidentified worms from a forest, release excess worms outdoors or assume that ordinary large nightcrawlers behave like surface-feeding compost worms. The University of Minnesota’s invasive-earthworm guidance expressly recommends checking purchased composting worms and avoiding their release into the environment.
Introduce worms onto the conditioned upper bedding so they can move into it without being buried under a deep layer of unfamiliar feedstock. Begin with a thin layer of safe, suitably prepared organic material on top and observe how the colony responds. NC State gives less than 2 inches as an example top-feed layer for a raised reactor; it should not be read as permission to add that depth of every feedstock regardless of its condition or the colony’s capacity. Do not cover worms with fresh heating manure or large concentrated piles of scraps.
Continue adding feed only after much of the preceding material has broken down and the upper working zone remains suitable. UMass Extension emphasizes that feeding rate depends on the material, moisture, temperature and worm population. If the bed heats noticeably, smells sour or sharply of ammonia, or contains substantial uneaten rotting feed, stop additional loading and correct the source of trouble before the next feeding. Avoid routinely turning the entire reactor, which undermines the relatively undisturbed upper working layer that CFT systems are designed to retain.
Make the first bottom harvest only when the lower layer is ready
There is no universal first-harvest date. At startup, the bedding and temporary grate lining may still form part of the bottom layer. Harvesting too early can remove unfinished material, pull worms from their working habitat or destabilize the bed. Wait until the reactor has accumulated a distinct, older, processed layer beneath the active zone, and follow any minimum-fill or startup requirements specified by the equipment manufacturer.
When the system is ready, collect vermicompost from beneath the outlet in a clean container. With a designed grate-and-bar system, the NC State harvesting procedure describes passing a hand-operated or mechanically driven bar across just above the grate, allowing a thin layer to fall. A bag-style reactor instead uses its designed bottom opening. Do not dig a channel upward into the active worms, yank on a stuck grate or pry a loaded discharge open. The bottom harvest should be deliberately controlled and should not empty the chamber.
Inspect the collected material. Mature vermicompost is generally darker and more crumbly than fresh feed, although appearance alone cannot prove it is fully processed, hygienic or free of small worms and cocoons. If the first discharge contains obvious scraps, masses of living worms, or substantial intact startup liner, postpone further harvesting and let the system mature. Recover displaced worms gently into suitable habitat rather than throwing them out with the product.
The Santa Clara County Cooperative Extension example describes repeated top feeding and bottom harvesting once its working reactor is established; it is an illustration of the cycle, not a schedule that every startup must meet.
Maintain separate checks for the top, middle and bottom
The most useful maintenance inspection follows the material pathway. At each feed visit, look at the upper surface for uneaten material, worms near the food and any unusual odors. Check that the bedding remains damp but not waterlogged, and that ventilation openings stay clear. UC Santa Barbara’s maintenance guidance explains why waterlogged conditions obstruct oxygen exchange in a worm system.
Periodically inspect the walls and middle working depth, where practical and without dismantling the active colony. Look for excessive compaction, persistent wet pockets, temperature changes and unwanted pests. Make only localized adjustments needed to restore suitable conditions rather than routinely mixing the entire bed.
Before each planned harvest, inspect the outlet and space beneath it. Confirm that the collection container is in place, the mechanism moves freely with appropriate guards, and the last harvest did not expose a gap or allow a large portion of the bed to slump. Afterward, clean spilled material, check for escaping worms and secure the bottom closure.
Do not treat drainage runoff as finished worm tea. NC State distinguishes leachate from vermicompost extracts and warns that runoff from undigested material may contain harmful organisms or compounds. A healthy reactor should not rely on accumulating liquid beneath it. Keep any runoff contained and determine appropriate disposal under local rules rather than applying it uncritically to edible crops.
Stop the process when a condition could injure worms or people
The table below distinguishes observable failures from an assumed diagnosis. It is a practical troubleshooting synthesis, not a tested repair protocol for a particular manufacturer’s machinery.
| Observation | Immediate action | Resume when |
|---|---|---|
| Newly loaded feed is heating or smells strongly of ammonia | Stop feeding; assess and remove the unsuitable material where safely accessible | Suitable, conditioned feed and stable worm habitat are restored |
| Wet, compacted material or liquid collecting in the bed | Stop adding liquid or watery feed; inspect drainage and airflow | There is no pooling and the working bedding is suitably aerated |
| A grate, frame or stand bends or shifts | Stop using and keep people out from beneath the unit | The structure has been inspected and corrected by someone qualified |
| Harvest opening sticks or releases too much material | Stop harvesting; do not force or bypass the mechanism | The outlet is repaired and controlled discharge is demonstrated safely |
| Many worms emerge in bottom harvest | Stop collecting; return displaced worms to suitable habitat | Lower material has matured and the harvest method is corrected |
| Rodent access, escaping worms or contaminated stock | Isolate the materials and block movement off site | Containment and, where relevant, species identification and local guidance are addressed |
For farms or institutions receiving off-site organic waste, check local waste-management, zoning and runoff requirements before opening the operation. The EPA’s discussion of composting settings notes that larger sites and some feedstocks can involve additional permits. Vermicomposting is not the same as validated hot composting for pathogen reduction; do not promise that worm processing alone sanitizes manure or makes material automatically safe for unrestricted food-crop use.
Check whether the installation is genuinely ready
A continuous-flow unit is ready to operate when the frame and grate are securely supported, the lower discharge works in a controlled manner, the collection space is accessible, bedding is stable and adequately aerated, and the worms can work safely in the upper feeding zone. The first harvest is a separate milestone and should wait for mature lower material rather than follow a rigid calendar.
Can I make the reactor from a large plastic tote? A plain tote with drainage holes is an ordinary bin, not necessarily a continuous-flow-through reactor. Without a safe, supported bottom-harvest design, its contents still have to be emptied or separated by another method. A manufacturer’s small flow-through container is a more appropriate model than cutting an unsupported opening into a loaded tote.
Does a continuous-flow worm farm need a motor? No. Small units can use a manually operated harvesting mechanism or a designed bottom closure. Mechanized units may suit other operations, but powered components add guarding and maintenance obligations.
Should I harvest every week? Not automatically. Inspect the maturity of the lower layer, the amount removed previously and the operating requirements of that model. Feeding and harvesting regularly does not mean the unit is ready to discharge mature compost on a fixed schedule from its first week.
One thought on “How to Set Up a Continuous-Flow Worm Farm”