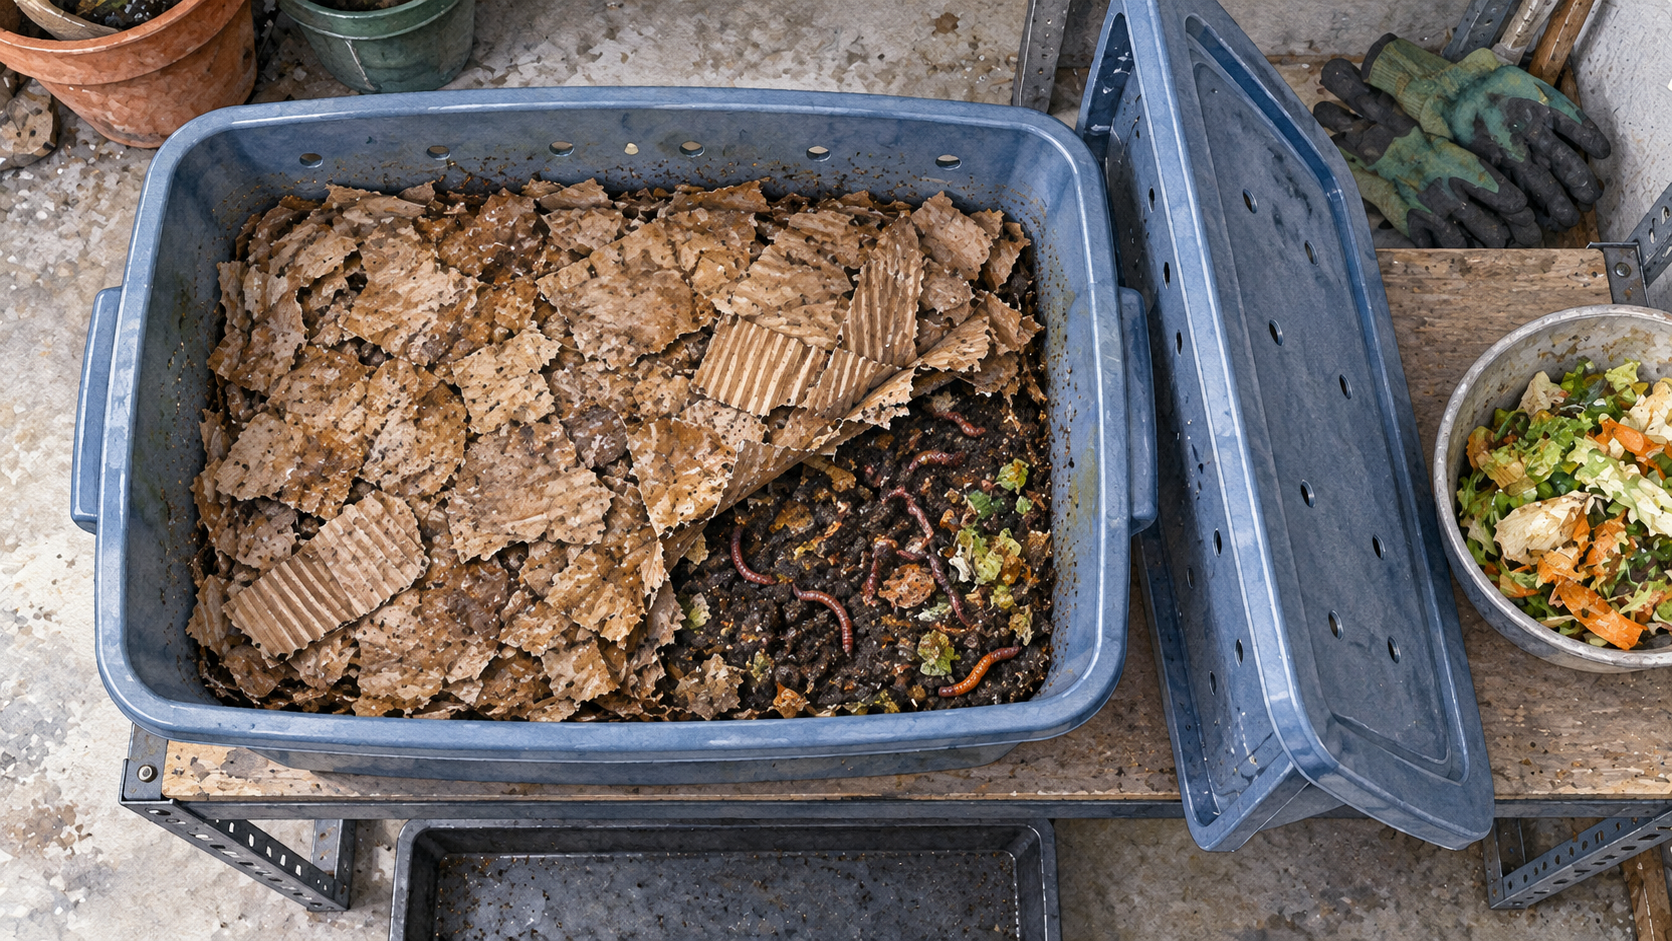
A vermiculture worm bin is a sheltered container that holds composting earthworms in moist, breathable bedding with biodegradable food. It gives worms and decomposer microorganisms a controlled place to break down organic material, while keeping the living colony accessible for regular care. A plain storage tote can serve this purpose if its design supports the worms; a purpose-built, multi-tray unit is not essential.
You may also see the terms worm composting bin, vermicomposting bin, and wormery. Vermiculture emphasizes raising and maintaining worms, whereas vermicomposting emphasizes converting waste into a soil amendment. In a household worm bin, the activities usually happen together. The container’s job is not to make waste rot as quickly as possible. It is to provide a suitable habitat throughout the process.
What Happens Inside a Vermiculture Worm Bin?
A functioning bin contains several interacting parts. Composting worms move through a layer of damp bedding and partly decomposed food. Bacteria, fungi, and other microorganisms begin breaking down organic material, and worms consume a mixture of decomposing material and microorganisms. As the contents are processed, the bin accumulates dark, fine-textured material containing worm castings and decomposed bedding. That mixture is commonly called vermicompost, although it is not necessarily pure castings.
The worms cannot do this work in an empty box of fresh peels. Loose bedding creates living space and holds moisture; small additions of suitable food support activity; oxygen must reach the contents. The basic worm-composting explanation identifies the container, bedding, worms, and food scraps as the core elements. A bin can look full yet be unsuitable if its interior is waterlogged, overheated, or compacted.
The process differs from a one-time composting batch because the worms remain alive in the habitat as new material arrives. They do not have to be visible on the surface to be working. A colony may be concentrated where food and moisture are suitable, while another part of the bin contains older material. The complete feeding-to-harvest process is covered separately in making vermicompost.
The Essential Features Every Worm Bin Needs
The most useful way to judge a worm bin is to ask what each feature does for the animals and for the person maintaining it. In a suitable system, the lid, walls, bedding area, and base work together rather than functioning as an airtight storage box. An overview of worm-composting systems emphasizes protection from light and rain, adequate air movement, and a way to manage excess water.
| Feature | Purpose | What happens if it fails |
|---|---|---|
| Covered, shaded enclosure | Limits light, rain intrusion, and access by pests | Bedding may dry out, flood, or be disturbed |
| Air openings or breathable construction | Supplies oxygen to worms and decomposer organisms | Wet, compacted material can develop foul, oxygen-poor patches |
| Moist, loose bedding space | Holds water while leaving passages for movement and air | Worms may dry out or become trapped in soggy material |
| Excess-moisture control | Prevents liquid collecting where worms live | Waterlogging can reduce oxygen and harm the colony |
| Removable lid or accessible working area | Allows feeding and inspection without dismantling the habitat | Food may accumulate unnoticed and problems become harder to correct |
| Contained base and protected openings | Helps prevent accidental escapes, spills, and pests | Worms or material may leave the intended enclosure |
A perforated lid alone is not enough if the contents are pressed into an airtight, wet mass. Equally, large drain holes cannot compensate for constant overfeeding or rain pouring into the top. Airflow, bedding structure, and moisture have to work together. The worm-bin design fundamentals also emphasize the combined need for ventilation and drainage, rather than treating holes as a substitute for good bedding. Detailed moisture management is a separate care topic, but its implications should shape the container from the outset.
What Worm Bins Are Made Of
Plastic and untreated wood are common worm-bin materials, and both can work if the enclosure provides light protection, airflow, moisture control, and access. Opaque plastic is easy to wipe clean, relatively light, and widely available. The worm-bin component guidance identifies wood and plastic as practical container materials, provided ventilation, drainage, and temperature protection are adequate. It also retains water and does not breathe through its walls, making suitable ventilation and drainage especially important. A clear tote may let a keeper see the contents, but it offers less protection from light and usually needs an opaque cover or sheltered location.
An untreated wooden box is more breathable than solid plastic and may help moisture escape through its sides. Its trade-offs include greater weight, eventual decay, and the need to check joints and edges for gaps or splinters. For direct contact with worms and compost, avoid pressure-treated lumber and wood with uncertain chemical coatings; worm-bin materials guidance specifically cautions against pressure-treated wood and some naturally insect-resistant woods. Repurposed containers should be clean and free of previous pesticide, solvent, or other hazardous residues.
A lid does not have to be permanently fastened down, but it should stay securely in place and be easy to remove for inspection. Screened vents can reduce entry by flies and pests where appropriate. Exact hole placement, cutting, and assembly belong in building a DIY worm composting bin, rather than in the definition of the container.
Which Earthworms Actually Live in a Worm Bin?
A vermiculture bin is intended for composting worms, especially species adapted to living in decaying organic matter near the surface. Red wigglers (Eisenia fetida) are a familiar example used in North American household systems. They can live among moist leaf litter, bedding, and decomposing scraps in conditions that are quite different from the mineral soil preferred by many large garden earthworms. The worm species and bin overview specifically distinguishes composting worms from earthworms collected at random from garden soil.
The bin should not be regarded as a universal enclosure for any worm-shaped animal. Deep-burrowing earthworms cannot be expected to flourish in a shallow layer of paper bedding and vegetable scraps. Conversely, worms sold as composting stock still require the right moisture, oxygen, temperature, and uncontaminated materials. A suitable species cannot compensate for poor housing.
Readers planning to purchase stock can compare the actual candidates in the guide to worms for vermicomposting. Here, the central point is simpler: the habitat and the worms must fit one another. A container designed for red wigglers is not automatically suitable for other earthworm species.
Why Worm Bins Tend to Be Broad Rather Than Deep
Many composting worms favor the upper layers of decaying organic material, where food, oxygen, and microbes are available. A broad working surface gives that activity room to spread. Depth is still needed for bedding and accumulating processed material, but a tall, narrow container is not automatically more productive than a shallower one with usable surface area.
This distinction helps explain why a storage tote with plenty of floor area can make a more practical worm bin than a tall household bucket of the same volume. In a very deep container, food scraps may pile into a wet core, the lower material may be difficult to reach, and checking the bottom for trapped liquid becomes awkward. A bin-design discussion likewise explains the usefulness of shallow working areas for surface-dwelling compost worms.
There is no universally ideal volume for every household. The amount of suitable food available, temperature stability, accessible bedding surface, and routine maintenance matter more than a marketing label on the container. A small bin may be adequate for modest kitchen scraps; a larger enclosure can hold more material but also becomes heavier and less forgiving if large volumes of wet feed are added. Specific starter-population calculations and whole-farm setup belong in starting an earthworm farm.
Common Worm-Bin Layouts You May Encounter
Some worm bins are simply a single working compartment with a removable cover. Others use nested containers, with a drainage or catchment space below the upper bin. Stacked-tray designs allow worms to move toward newly added bedding and food through openings between trays. Continuous-flow units instead add fresh material near the top and permit removal of more-processed material from a lower opening. These are differences in physical layout, not evidence that one product automatically yields better compost.
A simple bin makes the worms and bedding easy to see together. A tray system adds separate compartments but also more components to clean and check for moisture accumulation. In a flow-through unit, the intention is to keep the most active feeding area apart from older material, although successful operation still depends on suitable bedding and feed. These arrangements are described in current vermicomposting guidance, without making their performance interchangeable.
The terminology can be confusing. A worm bin may refer to any enclosed setup for maintaining composting worms; a worm farm can mean the same small container or a larger managed operation; a wormery is another name for a worm-composting enclosure. For a closer comparison of trays, bins, beds, and other methods, different vermicomposting methods owns that decision. Details of the special top-feed, bottom-harvest arrangement belong in continuous-flow worm farms.
How a Worm Bin Differs From a Regular Compost Container
A conventional backyard compost bin is mainly a place to collect and decompose organic material through microbial activity. It may be designed for larger batches of garden waste, with heating and turning used to manage a hot-composting process. A vermiculture worm bin, by contrast, must remain suitable for live worms throughout the process. A worm bin should not reach the high temperatures deliberately used in thermophilic composting.
This difference affects what goes into the container. Big heaps of fresh grass clippings, warm manure, or other heating materials can be tolerated or deliberately managed in some ordinary compost systems but are unsuitable for direct addition to a confined worm habitat if they generate heat or ammonia. Worm bins usually rely on smaller portions of compatible organic matter mixed with a breathable bedding matrix. Composting-with-worms guidance distinguishes cool vermicomposting from heat-driven conventional composting.
Neither approach is an all-purpose sanitizer. Properly managed hot composting can reduce some pathogens and weed seeds under validated temperature conditions, but a cool worm bin does not reliably provide that heat treatment. Do not use a household worm bin to make contaminated manure, pet feces, diseased plant debris, or questionable waste safe for food-growing areas. For ordinary household food scraps, the principal difference is biological: a compost bin can continue decomposing without a managed worm colony; a worm bin fails its purpose if it cannot keep its worms alive.
Where the Bin Can Be Kept and What It Needs Around It
A worm bin can fit in a utility room, basement, protected garage, or another space where temperatures remain appropriate and the lid can be opened comfortably. The surrounding area should accommodate a tray or washable surface beneath the unit, a place to hold dry bedding, and convenient access for periodic checks. Keeping it where it will be noticed makes it easier to catch food accumulating, unexpected odors, or a dry surface before those problems intensify.
Outdoors, shade and protection from heavy rain are essential, and the climate determines whether the container can stay there year-round. A black plastic box in direct sun may heat far above the surrounding air; a thin bin exposed to freezing conditions can chill throughout. Advice on worm-bin locations emphasizes protecting the colony from temperature extremes. A container in a barn also needs protection from rodents, poultry, and other animals that may knock it over or eat the worms.
The destination matters ecologically as well. Worms, cocoons, and used bedding should not be dumped outdoors merely because a bin has become crowded or its contents need replacing. Movement of live worms and potentially invasive species calls for care, particularly near natural woodland; the prevention questions are covered in avoiding the spread of invasive earthworms. Keeping the colony contained is part of responsible bin design, not just housekeeping.
What a Worm Bin Can and Cannot Produce
In a working bin, the primary solid output is vermicompost: a mixture of decomposed organic material, worm castings, and associated biological material. Some bins also collect liquid draining from wet contents. That liquid is leachate, not prepared “worm tea.” It has passed through partly processed material, and its microbial content can vary with feedstock and bin conditions. Compost guidance on worm-bin leachate warns that it can contain organisms and substances unsuitable for plants, particularly food crops. Manage it as excess liquid rather than promoting it as a guaranteed plant tonic.
Even a healthy worm bin is not meant to process every type of organic waste. It offers a way to keep composting worms and convert selected food scraps and bedding into a soil amendment. It is not a substitute for a hot-composting system when a material needs validated heat treatment, nor is a small household bin a safe disposal route for unknown chemical contamination. The general federal composting overview distinguishes worm composting from other compost systems and their operating conditions.
The bin’s output also does not tell you exactly how many worms it holds. Material may look fully processed while a large portion of the colony remains deeper in the bedding. Likewise, a new bin may take time to produce noticeable finished material without indicating that the container itself is faulty. Treat the vessel as a living habitat first and a compost-collection device second.
Three Practical Questions About Worm-Bin Design
Does a worm bin need a tap or faucet? No. Many stackable units include one because they have a reservoir beneath the worm compartment. A simple bin can instead use a removable catchment tray that is emptied and cleaned. A tap is a convenience, not a requirement for healthy worms. Persistent liquid accumulation is a reason to inspect moisture and drainage, not a desired production goal.
Will worms escape through ventilation or drainage holes? Some may travel through openings, particularly when conditions in the bedding are poor or after a new colony is introduced. Suitable screening and a catchment arrangement can limit escape, but blocking every opening is not a safe solution. Check the habitat and keep exposed spaces protected from pests rather than sealing off airflow.
Can you use a normal bucket with a tight lid? A bucket is not automatically a working worm bin. Its tall shape, limited working surface, and airtight lid may make ventilation, moisture control, and access difficult. A bucket modified to meet the worms’ needs may work for a small application, but a sealed bucket of wet scraps is primarily a storage container, not a sustainable worm habitat. The practical test is whether it can hold loose damp bedding, allow oxygen in, manage surplus water, and be inspected without disturbing the entire colony.