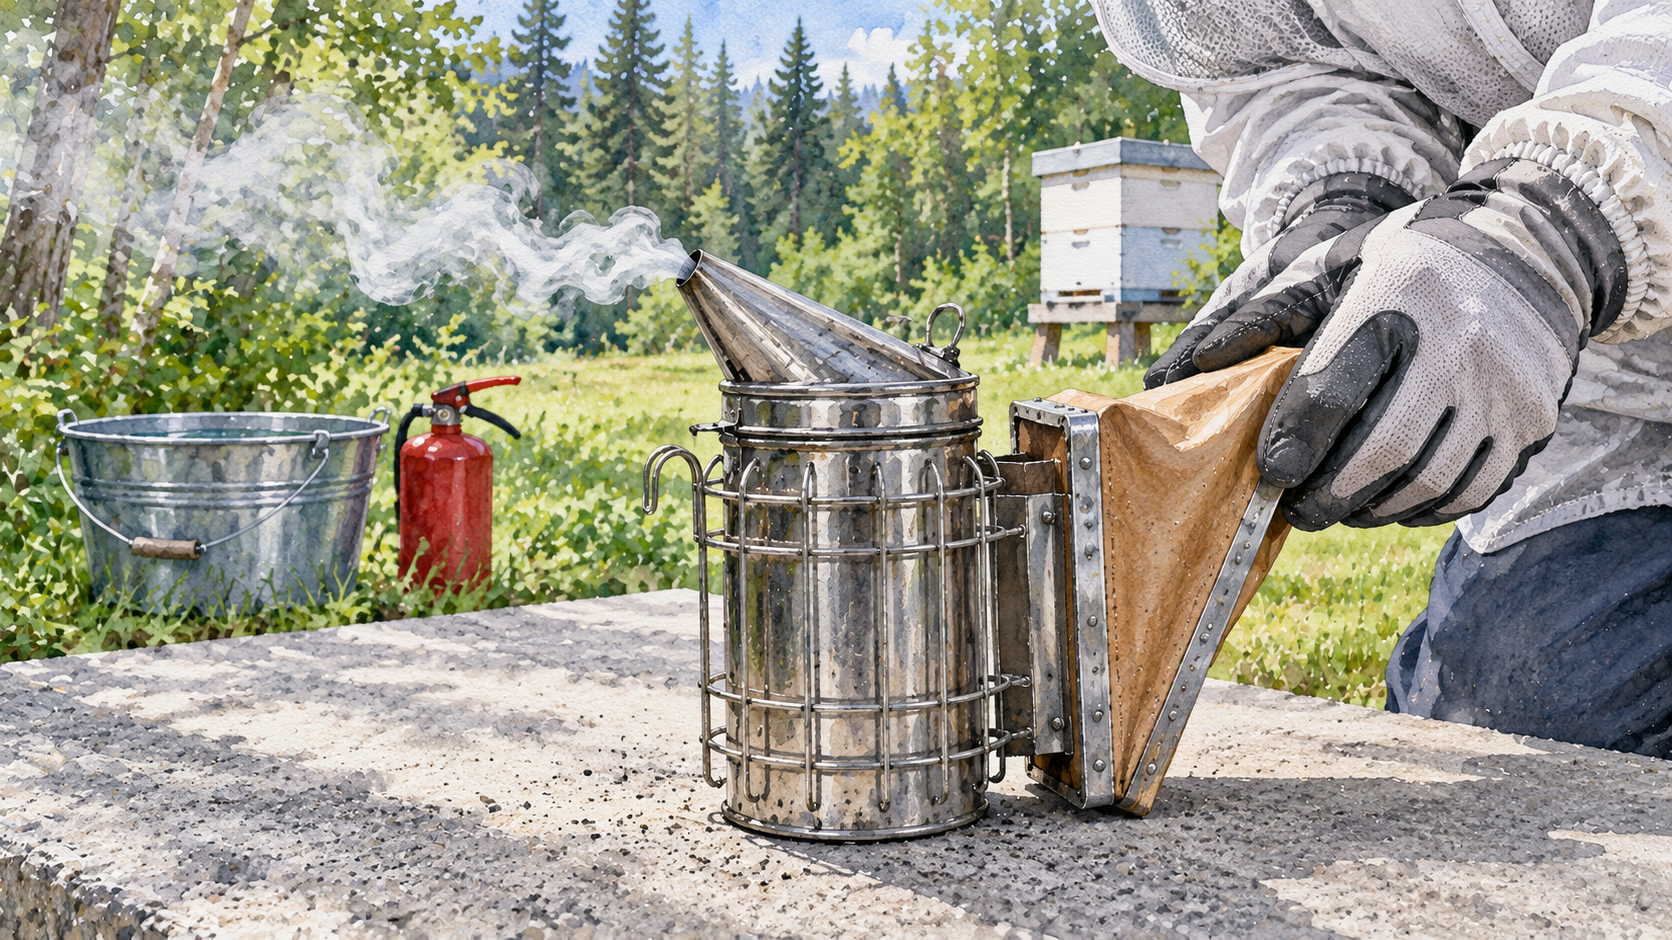
Use a bee smoker by lighting clean, untreated plant-based fuel in the bottom of its metal chamber, building a steady supply of cool smoke, and applying a few gentle puffs to a hive before and during an inspection. The smoke helps reduce defensive behavior in managed honey bees, but it must never carry flames or sparks toward the colony. A smoker also contains an active fire, so safe operation begins with checking weather, fire restrictions, and the ground around the apiary, and ends only when its contents are fully extinguished.
For a beekeeper tending one or several colonies on a U.S. farm, the aim is a reliable smoker that can be used sparingly, not a constantly smoking hive. If local fire conditions make lighting unsafe, postpone a routine inspection instead of trying to manage bees with an improvised flame or extra smoke.
Decide Whether It Is Safe to Light a Smoker That Day
Before preparing fuel, look at the immediate work area and the day’s fire conditions. Dry grass, straw, pine needles, loose feed sacks, hay storage, timber, and combustible hive materials can ignite if a smoker spills embers or its hot barrel touches them. Clear the small work area of combustible debris, identify a stable noncombustible place to light and rest the smoker, and make sure water and suitable fire-extinguishing equipment are available. Farm fire-prevention guidance specifically emphasizes keeping open-flame and spark-producing tasks away from flammable materials and having an extinguisher nearby.
Check current fire warnings and restrictions issued by the authorities responsible for your property. These can differ by state, county, land-management agency, and season. For example, state and local burn-ban guidance distinguishes fire-safety restrictions from air-quality restrictions and identifies multiple authorities that may regulate burning. The exact activities prohibited depend on the order. Do not assume that an agricultural activity or an enclosed smoker is automatically exempt from a burn restriction. If the rules are unclear, verify them with the relevant fire authority before lighting anything. In high winds, extremely dry conditions, or an area where a falling ember would be difficult to contain, the safest choice for nonurgent hive work is to defer it. Wildfire-prevention advice stresses checking local fire restrictions and taking particular care with spark-producing equipment.
Dress for handling bees before approaching the hive, including a properly secured veil, protective clothing, and footwear appropriate for the ground. A heat shield on the smoker helps separate its metal body from clothing, but neither the shield nor a bee suit makes it safe to touch the barrel. Fit and coverage are addressed separately in what to wear when beekeeping. Keep children, bystanders, livestock, and flammable storage materials clear of the lighting and work area.
Inspect the Smoker and Prepare a Fire-Safe Work Surface
A conventional bee smoker has a metal fire chamber, a hinged lid with a tapered spout, a grate that supports burning fuel, and bellows that blow air beneath the fuel. Some models also have an exterior heat shield and a hook for hanging the smoker. Before every use, check that the bellows move air, the lid closes securely, the spout is not obstructed, and the grate is seated correctly. The goal is a controlled draft from the bottom of the chamber through the fuel, not a sudden burst of flame from the top.
If the smoker was used previously, make sure it is cold before clearing old ash. Remove ash and loose carbon that obstruct airflow; carefully clean heavy residue around the lid or spout when needed. Cracked bellows, a loose or damaged lid, and a missing grate are reasons to repair or replace the smoker before using it near bees. Practical smoker-lighting guidance explains why establishing a fire below the fuel matters for reliable smoke.
Set the smoker upright on a stable stone, concrete, or other noncombustible surface away from hive entrances, dry vegetation, vehicles, and fuel containers. A clean metal pail or suitable fireproof stand can provide a safer temporary resting location than bare grass, provided it is stable and does not trap heat against combustible material. Have an appropriate means of extinguishing hot fuel ready before lighting. Do not light or operate the smoker inside a barn, shed, enclosed vehicle, or other poorly ventilated space. You will be handling hot metal, smoke, and embers, not merely a handheld beekeeping accessory.
Choose a Fuel That Produces Clean, Manageable Smoke
Dry pine needles or pine straw are widely used because they catch readily and can provide a sustained plume after additional fuel is placed over the initial flame. Other options include clean, untreated wood shavings, dry decayed wood from a known uncontaminated source, and plain natural-fiber smoker fuel intended for beekeeping. Some beekeepers use clean burlap, but it should be new or demonstrably free of agricultural chemicals and synthetic coatings. As beekeeping equipment guidance explains, the fuel should be free of chemical coatings that could harm bees; untreated wood and food-grade burlap are preferred over materials of uncertain origin.
Choose a fuel you can identify, keep dry, and replenish safely. A little plain paper can help start the fire, but paper alone burns quickly and is not a dependable long-burning charge. Avoid collecting plant material from areas recently treated with pesticides or other chemicals. Farm feed bags, fertilizer sacks, painted or pressure-treated wood, laminated packaging, plastic twine, synthetic cloth, scented material, and trash are inappropriate smoker fuel even if they ignite easily. Do not add gasoline, diesel, kerosene, lighter fluid, or other liquid accelerants to the smoker. They can create sudden flare-ups and undesirable fumes.
Fuel choice also changes the heat and airflow. Densely compressed pellets or large wood chunks may burn hotter and can present a greater ember hazard than a controlled charge of light fibrous fuel, especially when the smoker is tipped or the bellows are worked hard. Experienced beekeepers may manage several fuel types, but beginners can reduce variables by starting with a known dry, untreated natural material. The objective is cool smoke from smoldering fuel, not the largest visible cloud.
Light the Smoker From the Bottom, Then Build the Fuel Bed
Light the smoker in the cleared, fire-safe area, before you begin opening any colony. Put on protective clothing, keep water and your fire-control supplies close, and have a metal tool available for handling the hot lid or fuel. Never place fingers into a chamber that has been lit.
- Start with a small, loose bundle. Place a modest amount of dry pine needles or similarly suitable tinder in the bottom of the smoker, above the grate. Ignite it with a match or long-reach lighter. Keep your face clear of the opening.
- Establish an actual flame at the bottom. Give the bellows several controlled squeezes until the tinder burns steadily. Simply smoking a small piece of material at the top does not establish the fuel bed needed for sustained operation.
- Add fuel in stages. Put another small amount of dry fuel above the burning tinder. Operate the bellows enough to establish combustion beneath it, then add more. Avoid packing a large unlit mass into the chamber all at once; it can smother the first flame.
- Fill for the job without blocking airflow. Add enough fuel to support the planned work, following the smoker manufacturer’s instructions. The charge should remain secure while leaving an effective path for air and smoke. Excessive compression can restrict the draft.
- Close the lid and test the output. Pump the bellows gently away from people and bees. A controlled stream of visible smoke should emerge without sparks, flames, or pieces of burning material.
- Keep the chamber upright. Hold or rest the smoker so hot fuel stays below the spout, and do not set it on a combustible hive component while testing.
The bottom-up lighting method is particularly helpful for a beginner because each new layer catches before the next is added. If fuel will not establish a steady burn, correct the lighting process in the safe preparation area rather than repeatedly blowing unlit or sooty material at the colony. Do not rush toward the hives with visible flame still emerging from the smoker.
Check the Smoke Before Directing It Toward Bees
The output should be visible, reasonably cool, and free of sparks. Thick white smoke can be normal for a smoldering smoker, but color alone is not a safety test. Fuel composition, moisture, and combustion conditions all affect appearance. A particularly harsh, dark, acrid plume, a spout that spits embers, or visible flames indicate a problem to correct before approaching the hive. Guidance on handling bees emphasizes developing a steady, cool stream rather than relying on large bursts of smoke.
Test the output by directing a small puff into clear air, away from faces and combustible materials. You can cautiously assess the plume’s warmth at a safe distance, without placing bare skin next to the hot metal or in the path of a possible ember. A beginner should never assume that because the smoke looks pale it cannot burn bees. If sparks emerge, stop using the smoker on the hive immediately. Return it to the noncombustible surface, check for fuel near the nozzle, and correct the charge or airflow using tools suitable for hot metal.
Too little visible smoke may mean the fire was never properly established, the grate is clogged, or the fuel has been packed so tightly that air cannot pass through. A very hot, forceful plume may indicate excessive airflow, inadequate fuel above the flame, or an overly hot fuel. Address those conditions at the smoker rather than compensating with additional puffs. The beekeeping objective is a controlled, cool plume that can be applied lightly; a fire that is merely contained inside a metal cylinder is not yet ready for hive use.
Apply a Small Amount at the Entrance and Under the Cover
For an ordinary inspection of an established colony, direct one or two gentle puffs across the hive entrance where guard bees are active. Pause briefly so the bees can respond before disturbing the cover. You are trying to change how the colony reacts to the approaching disturbance, not fill every box with smoke. The recommended practice of starting with a few directed puffs is consistent with using the minimum necessary for the work.
Next, loosen the cover just enough to create a small opening, direct a light puff under it, and lower it briefly if appropriate before fully opening. As the top bars are exposed, an additional gentle puff across the surface may move bees away from the place your hands or tools need to go. Hold the spout far enough from bees and comb that neither hot metal nor a concentrated hot blast can touch them. Keep sparks, glowing material, and open flame away from the hive at every stage.
Some bees may retreat deeper into the equipment; others may continue normal activity. A brief increase in buzzing is not by itself proof that more smoke is needed. Smoke can make handling easier, but it does not prevent all stings or replace careful movements. For the order of examining frames, brood, food stores, and colony condition, use the separate guide on how to inspect a beehive. The smoker’s role here is limited to easing necessary access, not suppressing the entire colony throughout the inspection.
Use Less Smoke as You Work, and Stop Before You Overdo It
Continue only with occasional light puffs where bees are blocking a working edge or becoming more defensive during a necessary manipulation. Avoid continuously pumping smoke into open brood frames, aiming concentrated smoke directly at the queen, or filling the hive so heavily that bees run across the comb instead of moving away calmly. Excessive smoke can disrupt the colony and make it harder to judge what bees are doing. The beekeeping guidance for residential colonies supports measured smoking and gentle handling rather than forceful or prolonged disturbance.
Smoke is often described as simply masking an alarm scent. Research is more nuanced: it may affect bees’ perception of chemical signals and their defensive responses, but the precise combination of effects is not fully resolved. In a published study of defensive sting responses, smoke influenced venom-droplet release under experimental conditions without reducing the probability of sting extension. That laboratory finding is not a field measurement of how many puffs are ideal, and it is no reason to abandon practical low-smoke handling.
If the bees begin flying into your veil, following you persistently, or acting increasingly defensive despite careful work, do not keep adding smoke in an attempt to overpower the colony. Close it when safe, withdraw without swatting, and reassess another time. The broader causes belong in why a beehive may be unusually aggressive, while avoiding honey bee stings covers handling and exposure risks beyond this one tool.
Troubleshoot Common Smoker Problems Without Rushing the Hive
A smoker that needs constant pumping or produces erratic smoke can distract you at the exact moment a colony requires careful attention. The most useful troubleshooting question is whether the problem is in the fuel bed, airflow, or the fire risk itself. Make corrections on a noncombustible surface, keeping the open hive closed or attended to safely rather than trying to fix a hot smoker while holding a frame.
| What you notice | Likely issue to check | Safer next action |
|---|---|---|
| Smoke stops soon after lighting | Starter burned out before the main fuel caught | Re-establish the fire at the bottom, then add small fuel layers |
| Very weak smoke despite pumping | Damp fuel, blocked grate, restricted airflow, or spent fuel | Check the cold or safely cooled unit; replace with known dry fuel |
| Flames or sparks shoot from the spout | Fire too intense or loose hot material near the outlet | Stop pointing it toward bees or people; set it down safely and correct the hazard |
| Smoke is harsh, dark, or unusually acrid | Fuel contamination or poor combustion may be involved | Stop, extinguish if needed, and start over with clean untreated fuel |
| The smoker is hard to keep lit | Insufficient initial flame, tightly packed fuel, or leaky bellows | Inspect the draft and condition before relighting |
| Bees react badly despite more smoke | Smoke may be excessive, hot, or insufficient to overcome other causes of defensiveness | Reduce disturbance and close the hive when safe; do not escalate smoke |
These are checks, not guarantees of a single diagnosis. A smoker may fail for more than one reason, and hot components must not be dismantled with bare hands. A damaged bellows or loose lid should be repaired or replaced, not worked around by lighting a larger fire. The next step for routine maintenance or smoker faults should be less risk, not more heat.
Prevent Burns and Fires While Moving Around the Apiary
During work, keep the lit smoker upright, within sight, and away from straw, clothing, feed bags, wooden pallets, and vegetation. A metal hook may be useful where the smoker can hang securely without its hot barrel touching a hive wall or other flammable surface. Avoid setting it on polystyrene hive bodies, plastic covers, or any surface that could melt or scorch. A stable fireproof stand is preferable to balancing the smoker where a sleeve, animal, or loose object can knock it over.
Wind can carry an ember or redirect hot smoke toward your veil. Keep your face out of the smoke plume, work where smoke can disperse outdoors, and never blow smoke at people or livestock. Smoke inhalation is a separate human exposure concern even when the fuel is untreated. On a farm, be particularly cautious near barns, stored hay, fuel tanks, dry bedding, or equipment with combustible debris. Farm fire-safety recommendations apply even when the flame is enclosed in a small handheld device. A cleared beekeeping area also supports the broader principles behind choosing a beehive location, although hive siting and apiary layout are separate subjects.
Keep water or appropriate extinguishing equipment accessible, and never leave the lit unit unattended. If there is a spill, an emerging grass fire, or any fire you cannot extinguish immediately and safely, retreat and contact emergency services. A smoker’s ability to reduce sting risk does not justify introducing a wildfire or barn-fire risk. If you are uncertain whether a hot smoker can be handled safely in the conditions present, end the bee work and deal with the fire hazard first.
Extinguish the Fuel Completely, Then Clean and Store the Smoker
When the inspection is finished, close the hive, move to the cleared fire-safe area, and extinguish the smoker. Do not assume that a chamber with little visible smoke is cold. Its fuel bed may still contain glowing embers, and the metal body can remain hot after airflow stops. A smoker can also relight when fresh oxygen reaches its contents. Safe smoker handling instructions specifically warn against leaving an active smoker or putting it into a closed vehicle before the fire is completely out.
A straightforward method is to empty the hot fuel carefully into a noncombustible metal container suitable for hot ash, away from vegetation and people, then thoroughly wet the contents. Use tools and appropriate protection to avoid direct contact with the barrel or embers. Stir or check the extinguished contents as safely appropriate so dry material is not hidden beneath a damp surface. Do not pour live embers onto soil covered with leaf litter, into a trash bin, or into a compost heap. Before discarding ash or storing equipment, verify that the fuel and smoker are no longer hot and cannot reignite.
After cooling, empty residual ash, inspect the grate, clear deposits from the spout and lid as needed, and check the bellows for damage. Keep the smoker dry during storage to limit deterioration. Never transport or store a hot smoker in a passenger compartment, vehicle cargo area, barn, or shed; even a plugged spout is not proof that every ember has gone out. For other items used alongside it, how to use a hive tool covers the tool’s proper handling rather than adding those procedures here.
A Practical Stop-or-Proceed Check for Every Smoker Session
Safe smoker use can be reduced to three separate decisions. Each one must be satisfactory before moving to the next; success at a later step cannot compensate for a failed earlier one. This is an editorial working checklist synthesized from extension and fire-safety guidance, not a manufacturer certification or an experimentally validated safety test.
First: Is any flame acceptable here today? Confirm current restrictions, wind and dryness, an area cleared of flammable material, safe separation from people and farm storage, and water or suitable fire-control equipment. If these conditions are not met, do not light the smoker for a routine inspection.
Second: Is the smoker actually producing usable smoke? Confirm clean, known fuel; an intact grate, lid and bellows; and a stable plume with no sparks or flame. If the smoke is hot, contaminated, erratic, or carrying embers, correct the source at the fire-safe preparation area before approaching bees.
Third: Are bees responding to light, targeted smoke? Start with a small application at the entrance, add only what the task requires, and stop increasing the dose if disturbance or defensiveness rises. Securely close the hive when necessary, then fully extinguish and cool the smoker before putting it away. If a bee sting occurs, move to safety; sting first aid and emergency warning signs are covered separately. The job is complete only when the colony is closed, the smoker fire is out, and the work area has been checked for stray embers.
4 thoughts on “How to Use a Bee Smoker Safely”