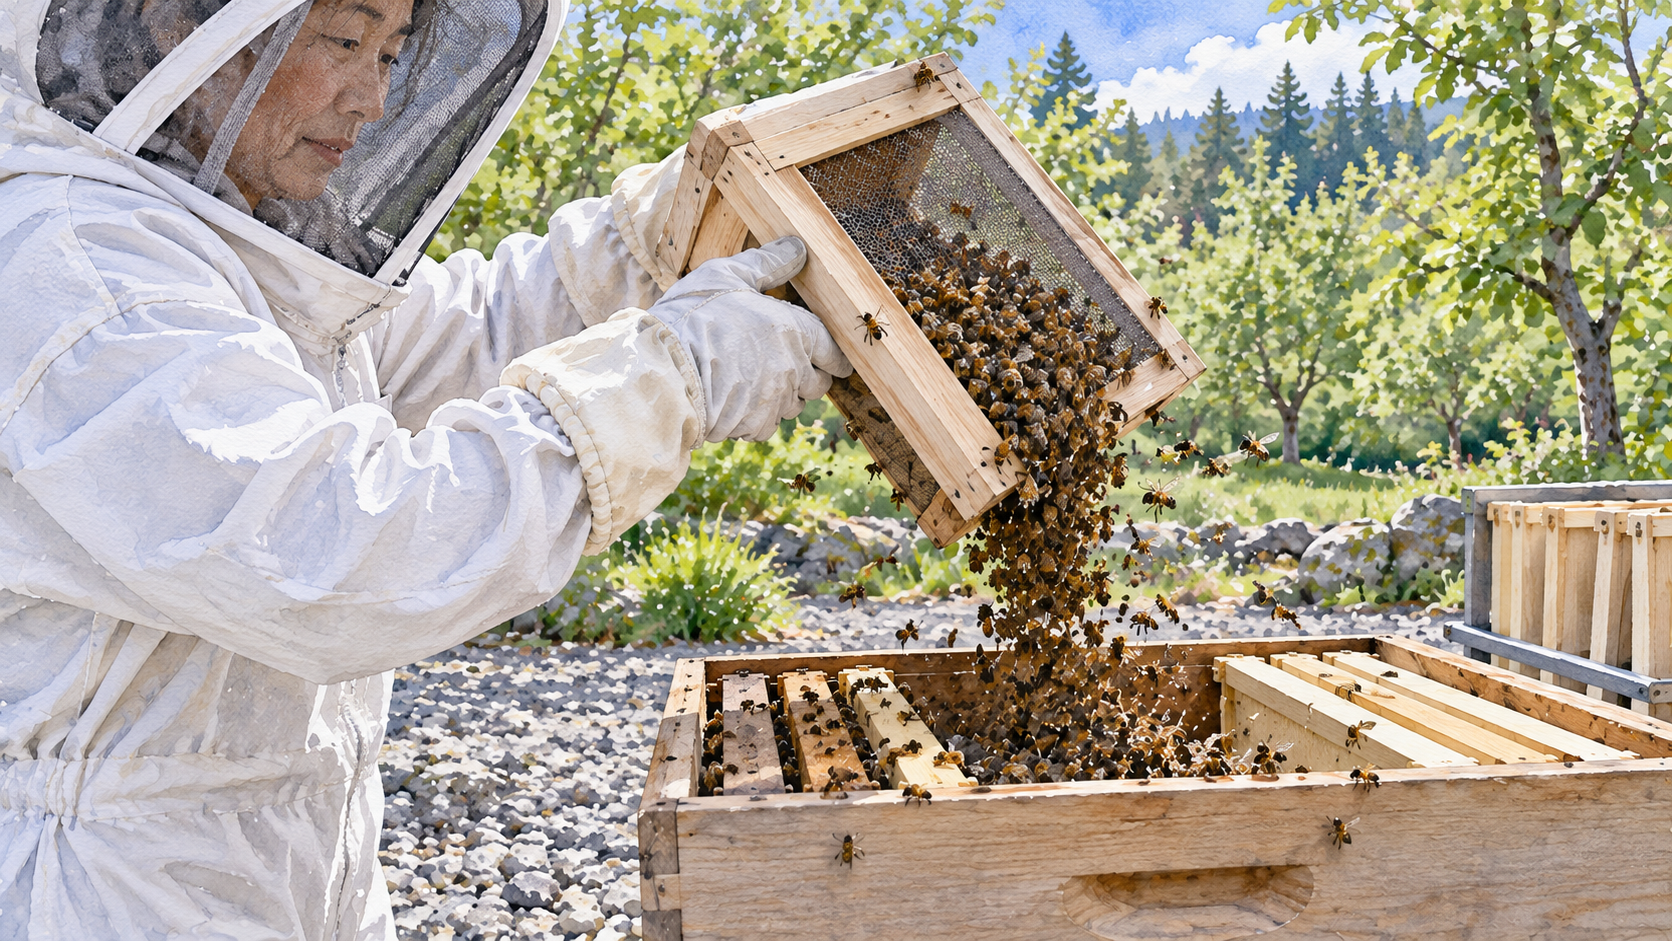
To install a package of honey bees, prepare a complete hive and feeder, take the caged queen out of the shipping container, secure her cage inside the brood box for gradual release, transfer the worker bees into the hive, and provide food. Return after a few days to confirm queen release, then check for new eggs once she has had time to begin laying. The queen cage is the most consequential part of the process: opening the wrong end or releasing her prematurely can put the new colony at risk.
This guide covers a typical spring package of Western honey bees (Apis mellifera) entering a standard removable-frame Langstroth hive in the United States. Package designs and queen cages vary, so read the supplier’s instructions before opening anything. If you have never handled live bees, arrange for a local mentor to be present for your first installation. You can prepare most of the work in advance; the bees should spend as little time as practical in their shipping box.
Get the Hive Ready Before the Bees Are Delivered
A shipping package supplies adult bees, a separately caged queen, and temporary feed, but it has no brood, comb, or established food stores. Have the hive standing in its final position with a level bottom board, one brood box, the correct number of compatible frames, an inner cover, an outer cover, a reduced but open entrance, and a feeder that can be serviced without spilling syrup on the hive exterior. The guide to beehive frames and foundation explains why all the frames must match the box. Do not rely on the package’s travel feeder as the colony’s food supply after installation.
Set aside three or four frames from the center of the brood box to make a temporary opening for shaking in workers. Keep the removed frames clean and within reach. If using an internal frame feeder, plan for the space it occupies as well; do not attempt to force a full set of frames and a feeder into a box designed for fewer components. Have a food-safe feeder ready with fresh light sugar syrup. A frequently recommended starting mixture is one part white granulated sugar to one part clean water, mixed until dissolved. Follow your feeder’s instructions and prevent leaks or drowning. The feeding guidance for new packages emphasizes continuous access while the colony builds comb and food stores.
Arrange the remaining supplies in the order you will need them: veil and protective clothing, hive tool, a secure way to hold the queen cage between frames, a small spray bottle if appropriate for the conditions, and a closed container for the shipping parts. Check the queen cage style with the supplier before delivery, since some have a visible candy plug and cork while others have plastic caps or a different release opening. Detailed clothing choices belong in what to wear when beekeeping; during installation, the immediate priority is a securely fastened veil and no exposed gaps at cuffs or ankles.
Handle Delivery and Weather Without Overheating or Chilling the Bees
Collect the package promptly and inspect the screened container before leaving the supplier or accepting delivery. Confirm that the screen is intact, workers are moving, the feed container has not obviously leaked, and the queen cage is present. A small amount of shipping mortality can occur. A large accumulation of dead workers, an unresponsive cluster, escaped bees, a dead queen, or a soaked package warrants prompt documentation and contact with the supplier before you proceed. A transport problem cannot be corrected simply by shaking the bees into a hive. These arrival and installation precautions explain why temperature and ventilation during transport deserve attention.
Keep the package shaded and ventilated on the trip home. Do not leave it in a closed vehicle, direct sun, or against a heater. Install as soon as conditions safely allow rather than planning to keep the bees in their traveling box for several days. If installation must be delayed, ask the supplier how to hold and feed that specific package; temporary storage recommendations vary with the bees’ condition, the length of transit, and temperature. Never seal ventilation openings to stop the bees escaping.
Aim for calm, reasonably warm, dry weather with daylight remaining. Published installation guides offer different temperature advice: one recommends conditions above 55°F, while another favors temperatures above 65°F. Those numbers reflect different practices and assumptions, not a universal legal or biological cutoff. On a cold, windy, rainy day, consult the supplier or a local experienced beekeeper rather than following a rigid calendar. Late afternoon is often convenient because fewer workers make prolonged flights before settling, but adequate visibility and a safe working temperature matter more than the exact hour. The regional start-time guide covers the separate decision of when to order and begin a colony.
Open the Shipping Package and Locate the Queen Cage
Put on protective clothing, set the screened package in shade next to the open brood box, and take a moment to identify the removable top panel, syrup can, and queen cage. The cage may hang from a metal tab or sit beside the feeding can. Before lifting components, have a plan to cover the package opening so workers do not pour out unexpectedly. Follow the package supplier’s removal sequence when its design differs from the conventional wooden screened box.
If conditions are suitable, some instructions recommend lightly misting the workers through the screen with 1:1 sugar syrup before transferring them. The purpose is to reduce flight and supply a little food, not to soak or immobilize the bees. Excess spray can make bees wet, cold, or sticky, especially in marginal spring weather. A smoker is generally unnecessary for this task because package bees do not yet have an established brood nest to defend. Keep one available only if the situation warrants it, and do not use heavy smoke to compensate for hurried handling. The package-installation demonstration illustrates how preparation and controlled movement reduce disruption.
With the package supported, remove the top closure and carefully lift out the shipping feeder without trapping bees or striking the queen cage. If needed, give the box a controlled tap to move workers away from the opening first. Retrieve the queen cage and hold it over the package or hive, not over open ground. Check visually that the queen is alive and moving. Attendant workers may share her cage, depending on the design. If the queen is dead, do not assume the package can simply be installed and left to solve the problem; contact the seller about a replacement and a safe temporary plan. Keep the remaining workers shaded and ventilated while you organize the next step.
Secure the Queen Cage for Gradual Release
The normal purpose of the queen cage is to let worker bees become accustomed to the queen while she is protected. For a conventional wooden cage with two corked ends, identify the end containing white sugar candy. Remove only the stopper covering the candy, leaving the opposite exit securely closed. Workers will gradually eat the candy barrier, providing a delay before the queen can leave. An uncovered opening without a candy barrier can release her immediately. If you cannot identify the release end confidently, stop and ask the supplier; queen-cage styles are not interchangeable. The published cage-positioning instructions describe the variations and stress checking the cage supplied.
Suspend the cage near the center of the brood box where workers can cluster around it and reach its mesh. Secure the cage with its built-in tab or a method suited to its design so it cannot slip to the bottom. Do not wedge it so tightly between frames that the screen is pressed flat against foundation, since workers need access to feed and attend the queen. Orient the release passage exactly as the supplier recommends. Published guides use different placements, including candy-end-up and horizontal arrangements; melted candy, blocked exits, or trapped attendants are reasons not to treat one orientation as universally correct. The essential checks are a clear exit, accessible screen, and a stable cage.
Do not release the queen directly on installation day merely because she appears active. Some specialist procedures use immediate release under particular conditions, but those are not an appropriate default for a beginner with an unfamiliar package. Allowing gradual release gives workers time to adjust and reduces the risk of rejection. If a package arrived with an unfamiliar plug, no candy, or a queen already loose among the workers, contact the supplier or mentor for the method appropriate to that situation instead of improvising a new opening. Queen introduction in package installation likewise distinguishes protected release from opening the cage immediately.
Transfer the Worker Bees and Replace Frames Gently
After securing the queen cage, hold the shipping package over the prepared gap in the center of the brood box. If needed, settle workers toward the bottom with a firm, controlled tap while keeping the top secure. Open the package and invert it over the empty space. Shake with short, deliberate motions so the bees drop into the hive. It can take several attempts, and a number of workers may fly. Work steadily rather than striking the box against hive edges or trying to remove every bee at once.
Let the bulk of the bees move across the bottom board and frames before replacing the removed frames. Lower each frame vertically and slowly, watching for bees on the side bars, bottom bars, and box rests. Pause whenever workers are crowded in a pinch point. The queen cage itself may occupy space between frames until release; leave the necessary temporary clearance according to the cage’s mounting method rather than compressing it or forcing the box shut. At the release check, remove the empty cage and restore the correct frame spacing. Proper use of the hive tool helps move components without levering against comb or crushing bees.
Place the nearly empty shipping box close to the hive entrance, out of pedestrian and livestock traffic, so remaining workers can crawl or fly toward the colony. Make sure the box cannot obstruct the entrance or become a rain trap. A few bees lingering in the container do not justify keeping the open hive exposed for a long time. Finish the installation, then handle the empty package safely once the remaining workers have moved on.
When a No-Shake Installation May Be Appropriate
An alternative is to position the opened shipping box in or above the hive so workers walk out rather than being shaken. This can reduce handling, but it works only when the box can be housed without crushing bees, blocking the queen’s access, interfering with ventilation, or leaving the colony exposed. The method usually needs an empty spacer or hive body above the frames and a properly secured top cover. It also requires a prompt follow-up to remove the shipping box and return the brood chamber to its intended configuration.
The principal drawback is that bees may linger in the shipping box and start building unwanted comb there. A beginner with only a single brood box, no suitable spacer, or an unfamiliar cage arrangement is better served by the ordinary transfer procedure with an experienced helper. The no-shake method and its limitations are described alongside the standard shaking method; neither should be mixed halfway through without checking how the queen cage and feeder will fit.
Do not confuse this option with leaving the bees inside the transport box outdoors for several days. A shipping package is not a weatherproof managed hive and has no durable comb, brood area, or reliable long-term food supply. Whatever transfer method you choose, the outcome must be adult bees in the prepared hive, a safely protected queen, correct frame access, and a feeder that can be maintained without repeated disassembly.
Feed the New Colony and Close the Hive Without Leaving Gaps
Once the bees are transferred, supply fresh light sugar syrup in the prepared feeder. A package arriving on bare foundation must build wax comb before the queen can establish a brood nest, and it has no reserve of capped honey to bridge poor foraging weather. Early feeding is therefore part of installation, not an optional reward for the bees. The early-colony establishment guidance explains the energy cost of comb building and why new packages need attention to food supplies.
Use a feeder suited to small colonies and to your hive arrangement. A securely covered internal feeder can limit exposed syrup and reduce opportunities for robbing. Check that its access points do not drown bees and that no syrup leaks down the sides or into the entrance. Avoid leaving uncovered syrup, open feed containers, or sticky equipment around the apiary. Do not feed honey from unknown colonies, which may introduce disease. The detailed reasons for feeder choice and when syrup is appropriate are covered in how to feed honey bees sugar syrup.
Set the inner and outer covers gently, ensuring that the queen cage, feeder, and remaining frame spacing do not hold the lid open. An entrance reducer may help the small colony defend its opening, but the entrance must remain accessible for flights and ventilation; do not seal it shut. Secure the roof against wind and animals. Observe briefly from a safe distance for bees orienting at the entrance and for unexpected leaking or blocked access. Avoid opening the hive repeatedly out of curiosity during the settling period.
The First Ten Days: Check Release Before Judging Egg Laying
Package installation is not complete when the last worker enters the box. The colony still needs to release and accept its queen, begin making comb, and start brood production. Those are separate milestones. The exact timing varies with cage design, weather, food availability, and whether the queen has usable drawn comb or must wait for new wax cells. Two technical installation schedules and the first-week inspection guidance recommend checking release after several days and looking for eggs later, rather than repeatedly disturbing the colony on installation day.
| When to check | Main question | What to do |
|---|---|---|
| Installation day | Is the hive assembled, fed, ventilated, and closed? | Verify externally; leave the colony to settle. |
| Approximately days 3–5 | Has the queen left the cage? | Briefly inspect the cage in suitable weather; remove it if empty and restore frame spacing. |
| Approximately days 7–10 | Is the queen beginning to lay? | Look for fresh eggs or young larvae on developed comb; check food access and whether comb is being drawn. |
| If there is no comb yet | Can eggs reasonably be present? | Do not diagnose queen failure from an empty sheet of foundation; assess feeding, weather, and comb construction first. |
These windows are practical guideposts, not promises that every queen will emerge or lay on the same day. Once she begins laying, worker brood takes about three weeks from egg to emergence, so the adult population may initially decline before the first locally reared workers replace aging package bees. Avoid assuming an immediate increase in bees is required for success. The longer first-month monitoring belongs in how to care for a new beehive during the first month.
What to Do if the Queen Has Not Been Released or No Eggs Appear
At the first brief check, look for the queen inside the cage before moving it. If the cage is empty, remove it carefully and return the frames to proper spacing. If she is still inside, do not immediately tear off the mesh or remove the remaining cork. Confirm that the candy opening was actually exposed, the cage screen can be reached by workers, and the exit has not become blocked. Check whether workers are calmly attending the cage or appear to be biting and tightly restraining it, although behavior alone cannot prove queen acceptance. Consult the supplier or an experienced local beekeeper before forcing release, especially if the package or queen has been unusually cold, delayed, or stressed.
If no eggs are visible at the later check, first ask whether workers have drawn usable cells. A queen cannot lay into unbuilt foundation. Consider whether the release date was later than expected, whether food is accessible, and whether cold weather has limited development. Fresh eggs are small and easy to overlook, so inspect suitable comb under good light without repeatedly searching the entire box. An established pattern of no eggs after sufficient time and suitable comb warrants prompt experienced assessment; a queen should not be declared dead from a single hurried inspection.
An obviously dead queen, absent cage, major shipping mortality, or repeated unsuccessful release requires prompt supplier assistance because the package began without replacement brood. If the queen escapes during handling, do not pursue her by leaving the hive open or scattering workers; secure the equipment and ask an experienced beekeeper for immediate guidance. Do not introduce a replacement queen while assuming the original queen is absent; a missed queen could lead to conflict. Similarly, irregular brood or other signs of disease call for qualified assessment, not automatic medication. This article stops at installation-related triage. Detailed procedures for checking a hive and managing Varroa mites are separate tasks.
Recognize Problems That Are Not Fixed by Adding More Bees
A small cluster at the entrance or bees flying around their new location can be normal during orientation. A substantial mass remaining outside after suitable settling time deserves observation for a blocked entrance, overheating, an insecure cover, a misplaced queen cage, or a hive interior crowded by equipment. Large numbers departing together, persistent movement away from the site, and an empty brood box raise concern that the package may be abandoning the hive. Do not assume every cluster or flight is an absconding event, and do not repeatedly open the hive to chase individual bees back inside.
Other early problems can be introduced during otherwise successful installation. A feeder that leaks may attract robber bees; large exposed openings can be difficult for a new colony to defend. A queen cage wedged against foundation can block workers from reaching her. Frames forced into place may crush bees or the queen cage. A package left in direct sun can be damaged before it reaches the hive. Check the underlying condition rather than treating the visible behavior as a diagnosis. A record of delivery time, weather, queen-cage type, release instructions, feed provided, and first-check findings can prevent confusion when the next inspection arrives.
A package is not parasite-free simply because it contains no brood. Varroa mites can travel on adult bees, so arrange a locally appropriate monitoring and control plan as the colony develops. Never add a mite-treatment product to syrup or use a medication without checking the current label for the intended species, colony condition, season, and other restrictions. The hive-establishment guidance explicitly notes that new packages can carry Varroa, while the seasonal management calendar explains why both new and established colonies require mite monitoring. Successful installation is the start of management, not a substitute for it.
Questions to Settle Before the First Follow-Up
Should you use a smoker when installing package bees? Usually not. Package bees generally have no established brood nest to defend, and routine smoker use adds little to the transfer. Use protective clothing and controlled movement instead. If bees behave unusually defensively or you feel unable to proceed safely, stop and get experienced help rather than applying more smoke indiscriminately.
Can you leave the package box next to the entrance overnight? A nearly empty shipping box can remain temporarily beside the hive in suitable weather to let stragglers move in, provided it is secure, does not block the entrance, and creates no hazard to people or animals. The bees’ real home must already be the closed, fed hive. Do not leave a largely full package uninstalled outdoors as a substitute for transferring it.
When should you add another brood box or a honey super? Not because the shipping container looked crowded. First establish that bees are occupying and drawing the available frames, the queen is laying, and the colony has adequate food and room. Expanding too early may create space the small colony cannot manage; the appropriate timing depends on development and conditions, not the date of delivery. Record what the first checks show before making that decision.
3 thoughts on “How to Install a Package of Honey Bees”